
I swear, some of my best recipes come from pure desperation! That’s exactly how these amazing Smores Hand Pies came about. Picture this: It’s summer, the kids are bouncing off the walls wanting s’mores, but a sudden thunderstorm rolls in. No campfire tonight! What’s a mama to do? I had a package of graham crackers staring back at me, some leftover marshmallows from, well, who knows when (marshmallows are eternal, right?), and a half-eaten chocolate bar hidden in the back of the pantry. (Don’t judge, we all have our stash!). That’s when the idea for these Smores Hand Pies struck me. I thought, “Why not put all that goodness into a portable, delicious little package?”
The first batch? Let’s just say it was…rustic. The crust was a bit crumbly, the filling oozed everywhere, and they looked like they’d been through a war. But the taste? Oh my goodness, the taste was pure s’mores perfection! That’s when I knew I was onto something special with these Smores Hand Pies. Over the next few weeks, I tweaked and tinkered, experimented with different crusts and fillings, and finally landed on this recipe, which I think is the best version. Now, these Smores Hand Pies are a family staple. They’re perfect for picnics, road trips, or, you know, those days when you just NEED a s’more but can’t fire up the campfire.
My philosophy in the kitchen is simple: good food, made with love, doesn’t have to be complicated. And these Smores Hand Pies are a perfect example of that. They’re easy enough for a weeknight dessert but special enough to bring to a potluck. This portable smores dessert is such a crowd-pleaser!
Listen, I know baking can be intimidating, but trust me, you can do this! Don’t worry if your crust isn’t perfect or your marshmallows get a little too toasty. That’s part of the fun! So, grab your ingredients, preheat your oven, and let’s make some magic together! I know you and your family are going to absolutely love these! By the way, if you’re a fan of hand pies, you should definitely check out my Halloween Whoopie Pies Treat! It will be just as big of a hit for your family.
What You’ll Need for This Smores Hand Pies
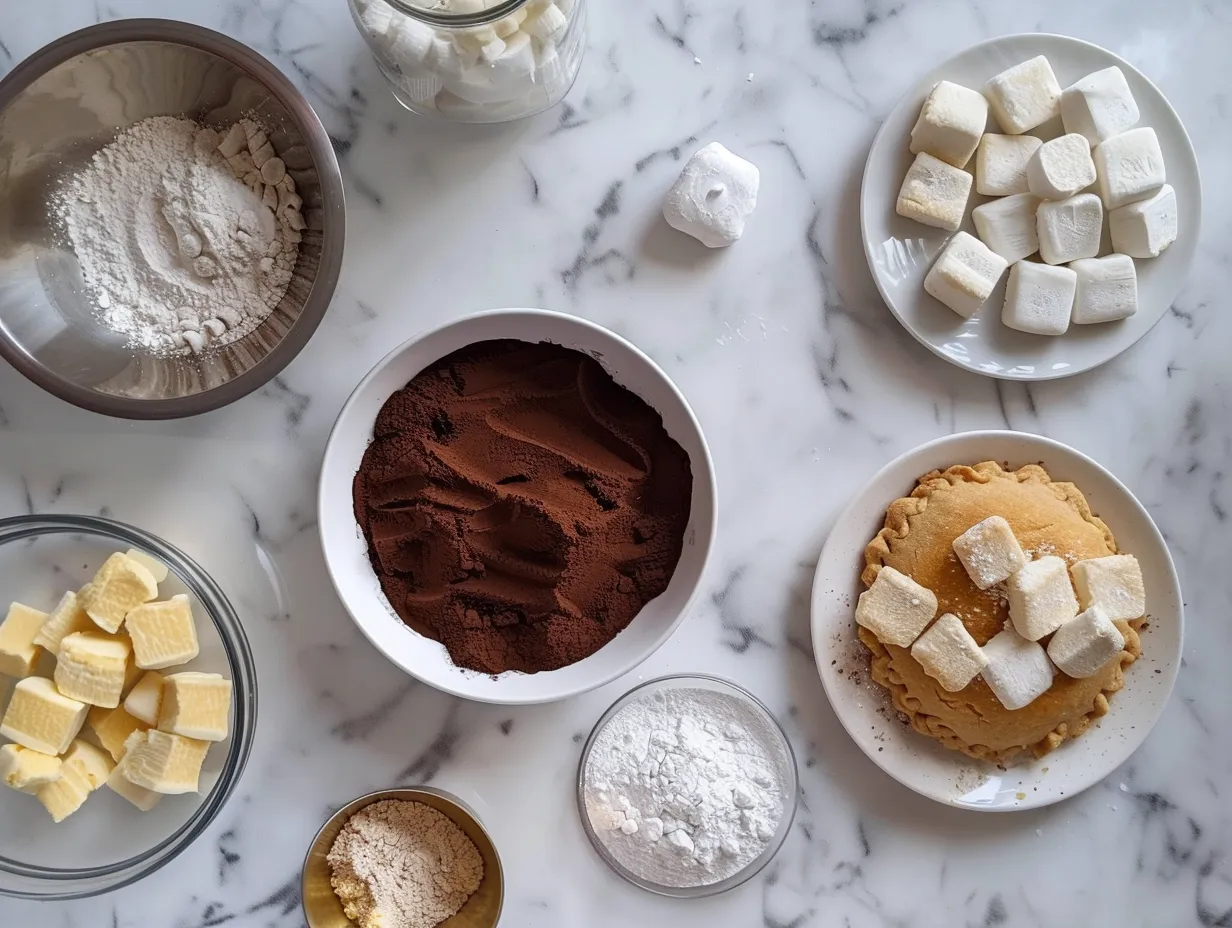
Alright, let’s gather our troops, shall we? Here’s everything you’ll need to make these scrumptious Smores Hand Pies. I’m a big believer in using good-quality ingredients whenever possible – it really makes a difference in the final flavor.
- 1 ½ cups graham cracker crumbs: I always use the regular honey graham crackers for my Smores Hand Pies, but you can experiment with chocolate or cinnamon graham crackers for a fun twist.
- 6 tablespoons unsalted butter, melted: I prefer unsalted so I can control the amount of salt in the crust.
- ¼ cup granulated sugar: Just a touch of sweetness to balance the graham cracker flavor.
- 1 (10-ounce) package mini marshmallows: Okay, here’s a trick I learned – use the flavored marshmallows! Strawberry or chocolate marshmallows add a fun little surprise.
- 1 cup chocolate chips: I’m a semi-sweet chocolate chip kinda gal, but you do you! Milk chocolate, dark chocolate, even white chocolate would work here.
- 1 tablespoon milk: This is optional, but I like to brush a little milk on top of the pies before baking for a golden-brown finish.
- Pinch of salt: Enhances all the flavors!
- Optional: Egg wash: For an extra golden crust.
Shopping tips: When making Smores Hand Pies, I like to stock up on graham crackers when they’re on sale – they keep forever! Check out this link for Favorite campfire hand pie recipes needed. You can usually find the mini marshmallows in the baking aisle of your local grocery store.
Here’s a trick I learned from my grandma: if your butter isn’t melting evenly, microwave it in short bursts, stirring in between, to prevent it from splattering. Also, store any leftover ingredients in airtight containers to keep them fresh for your next batch of portable smores dessert! Another one is to crush your own graham crackers if you don’t want to buy them pre-made.
Let’s Make This Smores Hand Pies Together
Now for the fun part! Let’s get our hands dirty and make some Smores Hand Pies. Don’t worry, I’ll be with you every step of the way.
- Preheat your oven to 350°F (175°C). While the oven’s warming, let’s prep the graham cracker crust.
- In a medium bowl, combine the graham cracker crumbs, melted butter, sugar, and salt. Mix well until everything is evenly moistened and resembles wet sand. This is your base for the Mini smores pies!
- Press half of the graham cracker mixture into the bottom of a 9-inch pie plate. Use your fingers or the back of a spoon to create a firm, even crust.
- Sprinkle the chocolate chips evenly over the crust. Don’t be shy! The more chocolate, the better!
- Top with the mini marshmallows. Again, make sure they’re evenly distributed.
- Crumble the remaining graham cracker mixture over the marshmallows. Gently press it down to help it adhere. Don’t worry if it’s not perfect – rustic is beautiful!
- Bake for 15-20 minutes, or until the marshmallows are golden brown and gooey. Keep a close eye on it – marshmallows can go from golden to burnt in a matter of seconds! In my kitchen, Smores Hand Pies usually takes about 18 minutes, but every oven is different.
- Remove from the oven and let cool completely before cutting into wedges. This is the hardest part, I know, but trust me, it’s worth the wait. The filling needs time to set up, otherwise, you’ll have a gooey mess.
I learned the hard way that it’s important to let these delicious Smores Hand Pies cool completely before cutting. The first time I made them, I was so eager to try them that I sliced into them while they were still warm, and the filling just oozed everywhere. It was still delicious, but definitely not pretty! Check out S’mores Hand Pies {Air Fryer} – Belly Full for another great recipe.
While the Smores Pie recipe is baking, I usually tidy up the kitchen and maybe sneak a few chocolate chips. I also sometimes start preparing dinner or help the kids with their homework. Hey, multi-tasking is a mom’s superpower, right?
Your Smores Hand Pies should smell like toasted marshmallows and warm graham crackers – pure comfort in a pie!
How I Love to Serve This Smores Hand Pies
Okay, so you’ve got this gorgeous Smores Hand Pies sitting on your counter, the aroma filling your kitchen. Now what? Here are a few of my favorite ways to serve and enjoy this delicious treat.
My family loves these Smores Hand Pies when I cut it into small squares and serve it as a dessert bar at parties. It’s always a huge hit! I also like to add a scoop of vanilla ice cream on top for an extra-special treat. Can you imagine how much your guest would love this portable smores dessert?
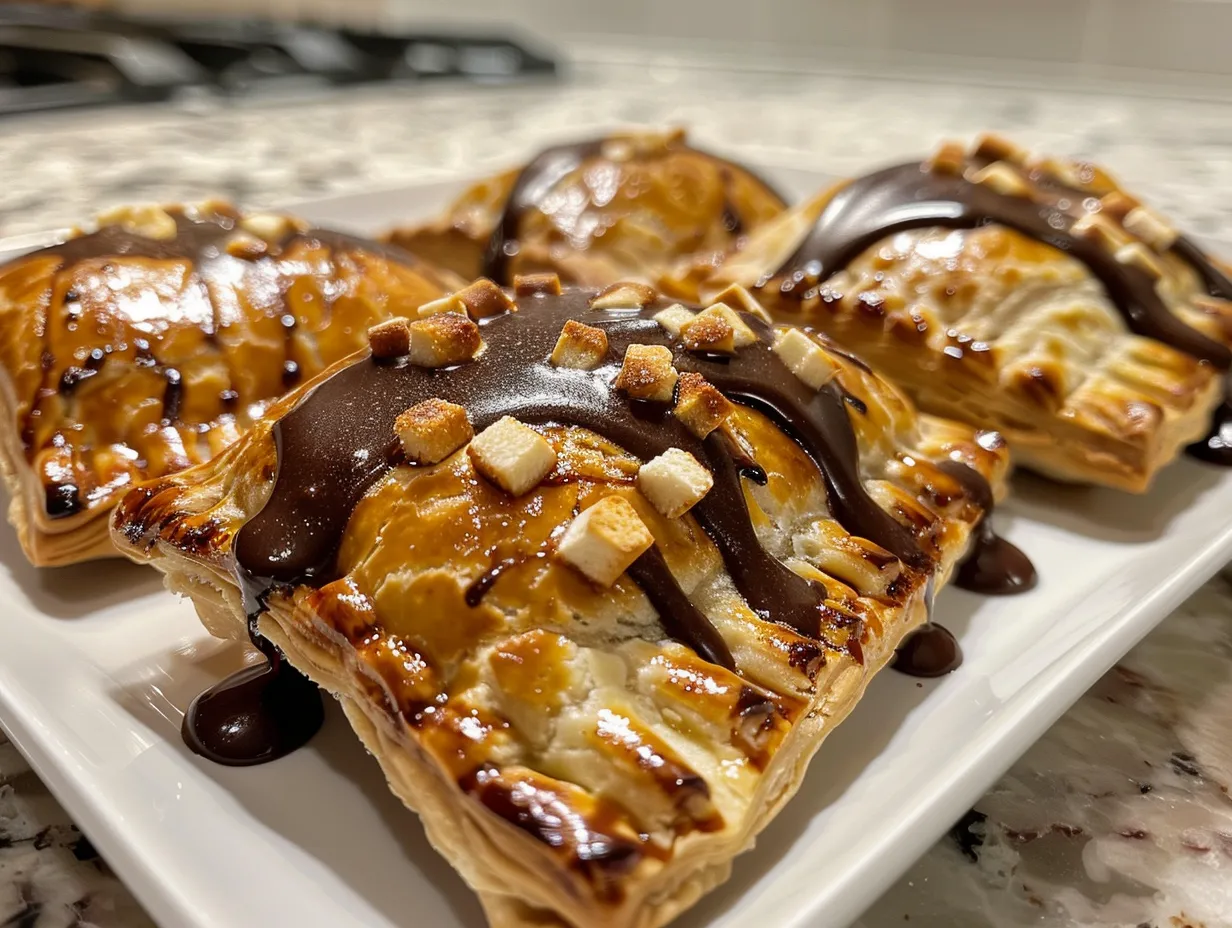
This Smores Hand Pies is perfect for picnics, barbecues, or even just a cozy night in. It’s also a great alternative to traditional birthday cake. If you want to get fancy, you can drizzle some melted chocolate or caramel over the top.
If you have extra Smores Hand Pies (which is rare in my house!), you can store it in the refrigerator for up to 3 days. Just be sure to cover it tightly to prevent it from drying out. You can also reheat it in the microwave for a few seconds to get that gooey marshmallow goodness back.
I’ve also tried making individual graham cracker hand pies using muffin tins. They’re perfect for portion control (not that I ever stick to just one!) and they look adorable.
Friends always ask for this Smores Hand Pies recipe whenever I bring it to a gathering. It’s so simple, yet so satisfying.
For presentation, I like to sprinkle a little extra graham cracker crumbs and mini marshmallows on top before serving. It adds a nice touch and makes it look extra appealing.
Your Smores Hand Pies Questions Answered
I know you might have a few questions about making Smores Hand Pies, so I’ve compiled a list of the most common ones I get from my readers and family. Let’s dive in!
Q: Can I use a different type of crust?
A: Absolutely! While I love the classic graham cracker crust, you could definitely use a shortbread crust or even a pre-made pie crust. Just be sure to adjust the baking time accordingly. You know what I do when my graham cracker crust is a little dry? I add a tablespoon of melted butter.
Q: Can I make this Smores Hand Pies ahead of time?
A: Yes, you can! You can assemble the pie and keep it in the fridge unbaked for up to 24 hours. Just add a few minutes to the baking time.
Q: My marshmallows are burning! What do I do?
A: Oh no! We’ve all been there. If your marshmallows are browning too quickly, tent the pie with foil for the remaining baking time. You can also lower the oven temperature slightly.
Q: Can I add nuts to this recipe?
A: Definitely! Chopped pecans or walnuts would add a nice crunch and nutty flavor. I would sprinkle them over the chocolate chips before adding the marshmallows. We love campfire hand pies with a little twist to them!
Q: Can I use full-size marshmallows instead of mini marshmallows?
A: You can, but you’ll need to cut them into smaller pieces so they melt evenly. Mini marshmallows are just easier and more convenient, in my opinion. The small marshmallows make for a more evenly distributed gooey center!
Q: My crust is crumbly and won’t stick together. What am I doing wrong?
A: It sounds like you might not be using enough butter. Make sure your graham cracker crumbs are fully moistened with the melted butter. You can also add a tablespoon or two of milk to help bind everything together. I recommend adding a touch more butter if needed.
Q: Can I make this Smores Hand Pies in an air fryer?
A: Yes, you can! Check out Air Fryer S’mores Hand Pies – The Slow Roasted Italian! Preheat your air fryer to 350°F (175°C) and bake for 8-10 minutes, or until the marshmallows are golden brown. My friend made these and loved them. Be sure to keep a close eye on it, as air fryers can cook quickly!
My Final Thoughts on This Smores Hand Pies
This Smores Hand Pies recipe holds a special place in my heart because it reminds me of those simple, joyful moments with my family. It’s a recipe that’s been passed down, tweaked, and loved over the years, and I hope it brings as much joy to your family as it has to mine.
Here are my pro tips for Smores Hand Pies!
- My Smores Hand Pies Pro Tip #1: Don’t be afraid to experiment with different flavors! Try adding peanut butter chips, caramel bits, or even a sprinkle of sea salt for a unique twist.
- My Smores Hand Pies Pro Tip #2: If you want a richer flavor, use dark chocolate instead of semi-sweet chocolate.
- My Smores Hand Pies Pro Tip #3: For a truly decadent treat, serve this Smores Hand Pies with a scoop of vanilla ice cream and a drizzle of chocolate sauce.
Over the years, we’ve tried a few variations of this portable smores dessert. My son loves it with peanut butter chips, my daughter prefers it with a sprinkle of sea salt, and my husband is a purist who likes it just the way it is. I have also made mini smores pies using my ghost mini taco pies recipe. Check them out!
No matter how you choose to make it, I encourage you to make this Smores Pie recipe your own. Add your own personal touches, experiment with different flavors, and most importantly, have fun! I hope this Smores Pie recipe will bring joy to your family.
I hope you enjoy making these gooey Smores Hand Pies as much as I do. It’s a simple, delicious treat that’s sure to become a family favorite. I hope this encourages you to make it a Portable smores dessert!
Happy baking, friends! And don’t forget to share your Smores Hand Pies creations with me on social media!
Smores Hand Pies

These Smores Hand Pies are a portable twist on the classic campfire treat! Flaky crusts are filled with gooey marshmallow and rich chocolate for a delightful dessert.
- Prep Time: 15 minutes
- Cook Time: 15 minutes
- Total Time: 30 minutes
- Yield: 6-8 hand pies
- Category: Dessert
- Method: Baked
- Cuisine: American
Ingredients
- 2 pre-made pie crusts
- 1 cup marshmallow creme
- 1/2 cup chocolate chips
- 1/4 cup graham cracker crumbs
- 1 egg, beaten (for egg wash)
- Coarse sugar, for sprinkling (optional)
Instructions
- Preheat oven to 375°F (190°C). Line a baking sheet with parchment paper.
- Unroll pie crusts and use a 4-inch round cookie cutter to cut out circles. You should get about 6-8 circles per crust.
- In a small bowl, combine marshmallow creme and chocolate chips.
- Place a spoonful of the marshmallow mixture in the center of half of the pie circles. Sprinkle with graham cracker crumbs.
- Top with the remaining pie circles. Crimp the edges with a fork to seal.
- Brush the tops with egg wash and sprinkle with coarse sugar, if desired.
- Bake for 12-15 minutes, or until golden brown.
- Let cool slightly before serving.
Notes
For an extra touch, drizzle with melted chocolate after baking.