
Oh, I can’t wait to share with you this delightful story about baking Heart-Shaped Cupcakes! It all started a few years back, right before Valentine’s Day, when I wanted to surprise my family with something sweet and special. You know, those little romantic cupcakes that are just bursting with love and charm? That’s exactly what inspired me to dive headfirst into making these Heart-Shaped Cupcakes.
I remember the first time I attempted this—I was juggling dinner prep and keeping the kids entertained, and I thought, “How hard can a little heart shape be?” Well, let me tell you, my first batch of Heart-Shaped Cupcakes came out a bit lopsided and my heart cupcake decoration skills were all over the place. But hey, that’s what’s wonderful about cooking; sometimes the mess-up moments become the best memories. And those imperfect little cupcakes smelled heavenly, the rich aroma of red velvet cupcakes filling the kitchen, the promise of sweetness warming the room.
What makes these Heart-Shaped Cupcakes stand out in our busy family life isn’t just their charming look but how easy and rewarding they are to make. Between school runs, chasing toddlers, and work deadlines, this recipe came as a perfect, quick pick-me-up. The recipe itself balances that classic red velvet flavor with a soft crumb and that luscious frosting that we all crave. Plus, baking romantic cupcakes like this feels like a little celebration of love, even in the hectic everyday moments. Whether it’s a rushed morning or a quiet afternoon baking session, these cupcakes bring an instant smile.
I first perfected this recipe after hunting for the right cake mix ratio and frosting consistency. I also found clever cupcake baking tips along the way, like how to get the heart cupcake decoration to pop without a ton of fuss. And please, don’t skip the step where you gently tap the pan to settle the batter — it really helps those heart shapes come out beautifully. These Heart-Shaped Cupcakes quickly became a family favorite, requested year-round, not just on Valentine’s Day.
If you’re ready to whip up some magic in your own kitchen, I’m thrilled to guide you through every step of making these sweet, lovable Heart-Shaped Cupcakes. Let’s get cozy, grab your mixing bowls, and dive into this fun baking adventure together!
And by the way, if you’re curious to see a different kind of comfort food that my family loves on chilly days, check out my creamy mac and cheese soup recipe. You’ll see how these little moments in the kitchen really stitch together warm family memories.
What You’ll Need for This Heart-Shaped Cupcakes
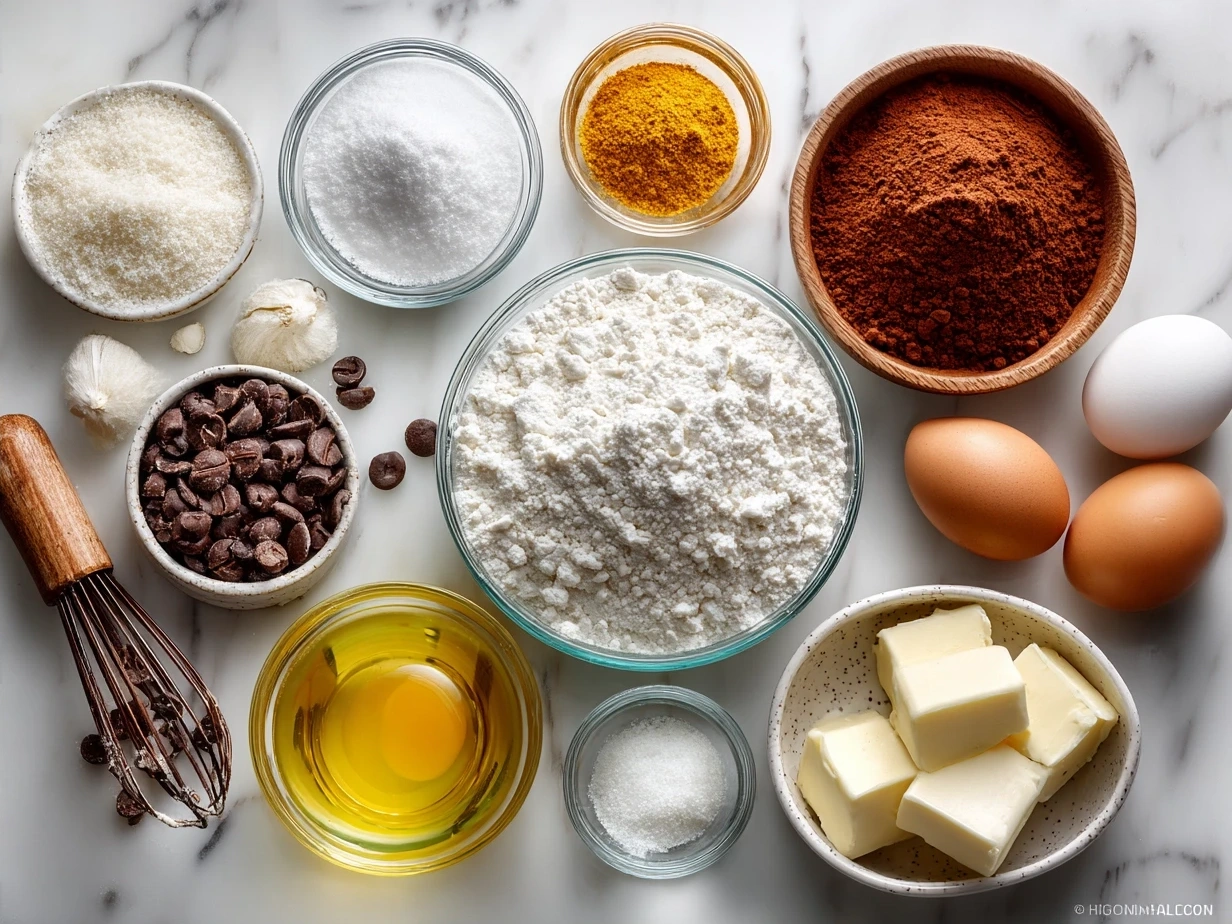
Alright, let’s talk ingredients. For Heart-Shaped Cupcakes, I always keep my pantry stocked with the essentials but with a little twist that brings out their charm and flavor. Here’s what I use:
- 1 ½ cups all-purpose flour (I prefer sifting it to keep the cupcakes light and fluffy)
- 1 cup granulated sugar
- 1 teaspoon baking soda
- ½ teaspoon salt
- 1 tablespoon cocoa powder (for that signature red velvet hint)
- 1 cup buttermilk, room temperature (this makes the cupcakes oh-so-tender)
- ½ cup vegetable oil (keeps things moist and rich)
- 2 large eggs, beaten
- 2 tablespoons red food coloring (I love a vibrant, classic red for these romantic cupcakes)
- 1 teaspoon vanilla extract
- 1 teaspoon white vinegar (helps the cupcakes rise perfectly)
For the frosting, I go with a classic cream cheese frosting — it’s creamy and tangy, balancing the sweetness beautifully.
- 8 oz cream cheese, softened
- ½ cup unsalted butter, softened
- 4 cups powdered sugar
- 1 teaspoon vanilla extract
One cool Heart-Shaped Cupcakes trick I learned is to use good quality vanilla extract and fresh cream cheese — it makes a world of difference in flavor. Also, when shopping for your ingredients, I like grabbing my buttermilk at the refrigerated dairy section of the supermarket; if you don’t have buttermilk handy, a quick homemade substitute with milk and lemon juice works great too.
If you’re short on time, no worries! I’ve found that prepping some ingredients ahead, like sifting flour and measuring sugar, can make your Heart-Shaped Cupcakes bake day feel like a breeze.
And a little cost-saving tip? Buying ingredients like sugar and flour in bulk helps a lot, especially if you plan to make more sweet treats like these romantic cupcakes or holiday goodies. Plus, leftover ingredients like extra cream cheese or buttermilk can be stored in your fridge for a week or so and popped into recipes like my egg hashbrown casserole when you need a savory break.
Oh, and speaking of heart cupcake decoration inspiration, you might want to peek at this How to decorate red velvet cupcakes? guide for some fantastic tips on that finishing touch!
Let’s Make This Heart-Shaped Cupcakes Together
Now, onto the fun part—making these Heart-Shaped Cupcakes! Don’t worry if you’re new to shaping cupcakes or feel a bit nervous. I’ve been there, and I’m sharing all my favorite cupcake baking tips to make this as effortless as possible.
- Preheat your oven to 350°F (175°C). Line your heart-shaped cupcake molds with paper liners or grease them lightly. I love these heart-shaped pans because they bring such joy—and if you don’t have one, I’ll share a nifty way to cut heart shapes later!
- In a large bowl, whisk together the flour, sugar, baking soda, salt, and cocoa powder. This dry blend sets the stage for your perfect Heart-Shaped Cupcakes.
- In another bowl, mix buttermilk, vegetable oil, eggs, red food coloring, vanilla extract, and vinegar. When I first started making Heart-Shaped Cupcakes, I underestimated mixing times; make sure everything is combined smoothly but don’t over-mix to keep your cakes tender.
- Gradually add wet ingredients into dry, stirring gently. You want that batter smooth with no lumps—this is where your cupcakes start looking luxuriously rich.
- Spoon the batter into each cupcake mold to about 2/3 full. I learned the hard way that overfilling can cause the cupcakes to lose their heart shape. While the Heart-Shaped Cupcakes bake, your kitchen will fill with that irresistible red velvet cupcakes scent that everyone loves.
- Bake for about 18-22 minutes or until a toothpick inserted comes out clean. In my experience, the timing depends on your oven, so keep an eye near the end. While they’re baking, I usually clean up a bit or start whipping up that cream cheese frosting.
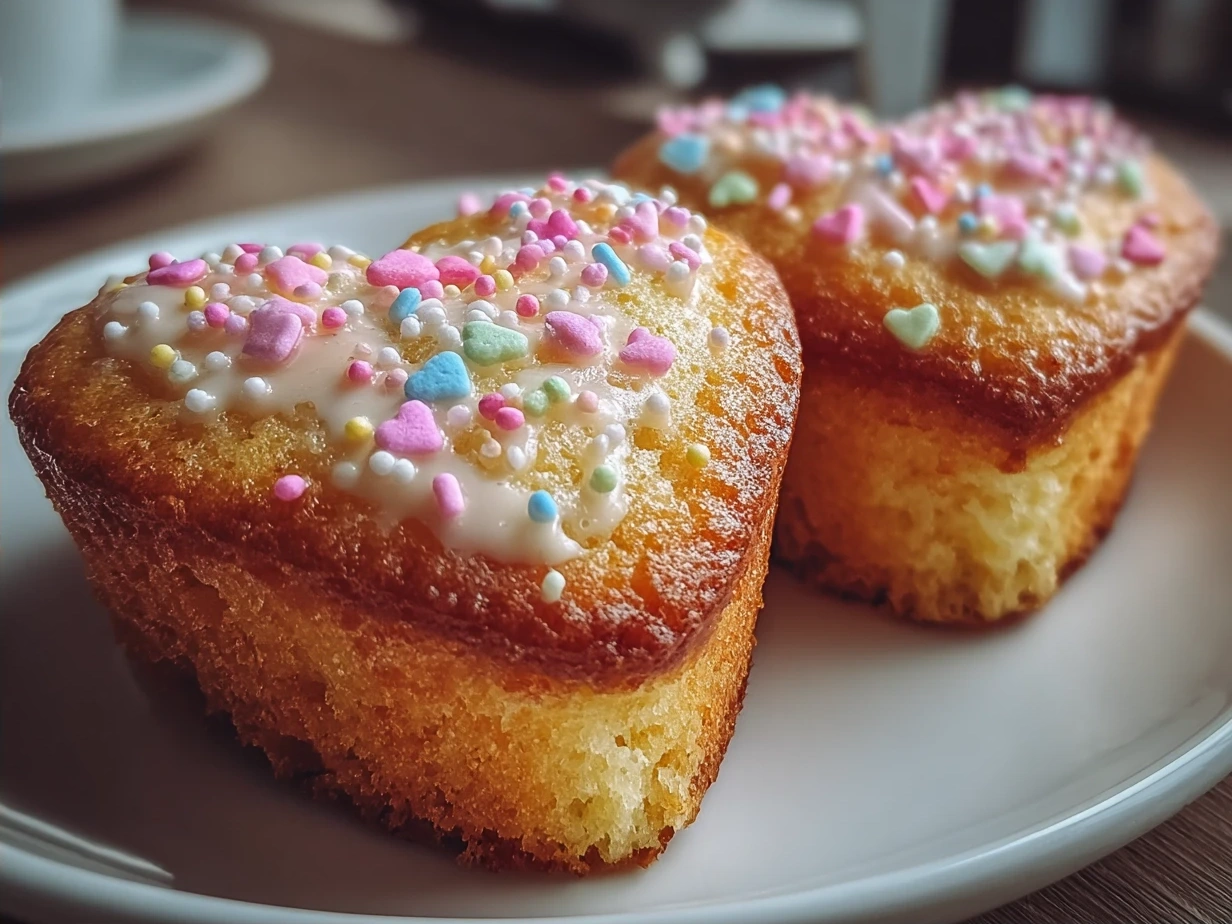
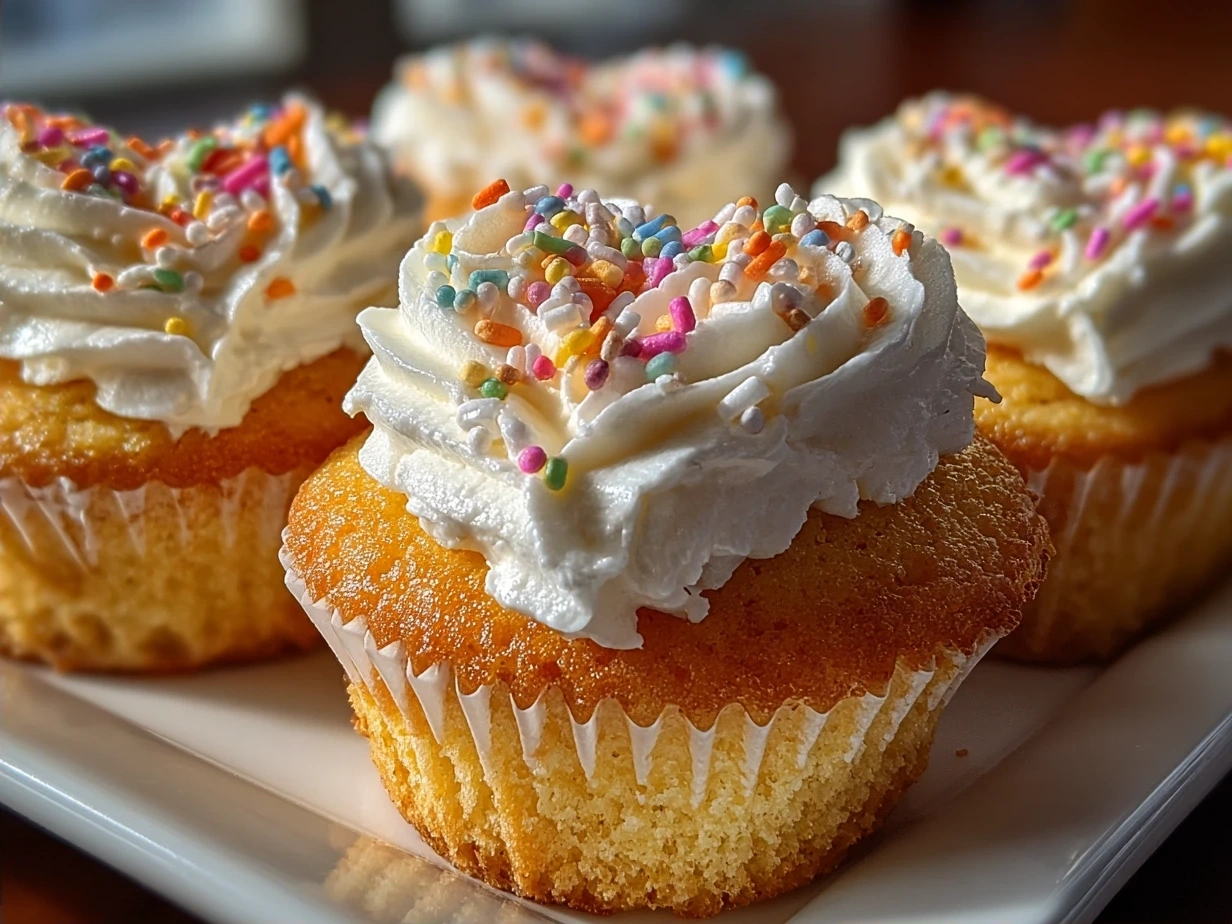
- Let them cool completely before frosting. This is crucial for the perfect heart cupcake decoration. Patience is key here—you don’t want your frosting melting off those cute shapes!
- Pipe your cream cheese frosting on top and finish with any heart cupcake decoration you like—sprinkles, edible glitter, or even a tiny candy heart. For inspiration on decoration, I often look at ideas on Heart Shaped Valentine’s Day Cupcakes – Mom Loves Baking.
Sometimes, if you don’t have a heart-shaped pan, here’s a quick shortcut: bake regular cupcakes and cut them into heart shapes with a cookie cutter once cooled. It’s a clever little trick I picked up a while back to save time without missing out on the fun.
Would you believe friends who try these at my house always ask, “How did you get these to look so perfect?” Truly, it’s all about the details like trusting your batter consistency and not rushing the cooling before decorating.
For more handy tips on Heart-Shaped Cupcakes techniques, I love this Red velvet peekaboo cupcakes ❤️♥️ They look gorgeous and they taste even better post—it offers beautiful visuals that can guide you through tricky steps.
How I Love to Serve This Heart-Shaped Cupcakes
Now, let’s talk about the best part—eating these charming Heart-Shaped Cupcakes! My family especially enjoys them when I bring them out for a cozy night in or as a sweet surprise on Valentine’s Day. They adore how the red velvet cupcakes’ richness pairs so well with the tangy cream cheese frosting.
I like serving them alongside a fresh berry sauce or even a dollop of whipped cream, which adds a light contrast to the richness. Another fun idea is pairing these romantic cupcakes with a warm cup of chai or hot cocoa, making the moment feel extra special. For occasions, I reserve these Heart-Shaped Cupcakes mostly for Valentine’s Day cupcakes celebrations or special family get-togethers—they just scream love and festivity!
When it comes to presentation, I sprinkle a little edible glitter or use heart cupcake decoration like tiny red or white sugar pearls to give them a festive sparkle. Sometimes I arrange them on a tiered cake stand, and it’s always a hit with guests. If you’re left with extra cupcakes (which almost never happens, but just in case), I love slicing them up for a quick trifle dessert or even heating one for breakfast topped with fresh fruit. Yum!
Seasonally, I’ve tried variations with flavored frostings, like peppermint in winter or strawberry cream in spring, to bring new life to the classic Heart-Shaped Cupcakes. They’re always met with oohs and ahhs from family and friends, and honestly, that never gets old. If you want to try recipes that pair well with these cupcakes, my creamy berry cheesecake recipe makes a lovely dessert duo.
Your Heart-Shaped Cupcakes Questions Answered
I get asked so many questions about Heart-Shaped Cupcakes from readers and friends, and I’m happy to share all the little nuggets I’ve learned.
Q1: How do I make my Heart-Shaped Cupcakes not stick to the pans?
A: Oh, girl, use those paper liners or lightly grease and flour the pans. When I first started, I neglected this step and had cupcake casualties. Now, it’s a must! Some people swear by silicone pans, which are fabulous too.
Q2: Can I substitute regular milk for buttermilk?
A: Yes! Simply add a tablespoon of lemon juice or vinegar to milk, let it sit 5 minutes, and voilà—you’ve got a buttermilk substitute perfect for your Heart-Shaped Cupcakes.
Q3: My heart cupcake decoration keeps sliding off—what’s going wrong?
A: Usually, this means the cupcakes weren’t fully cooled before frosting. I know the impatience, but cooling is key. Also, don’t overdo the frosting thickness; a nice balance works best.
Q4: Is it better to bake red velvet cupcakes or use a mix?
A: I prefer making mine from scratch—it’s fresher and you can tweak the recipe for sweetness and texture. But honestly, if you’re short on time, some boxed mixes work fine, and you can still turn them into charming Heart-Shaped Cupcakes.
Q5: Can I freeze these cupcakes?
A: Yes, you can freeze baked cupcakes without frosting in an airtight container for up to a month. Just thaw and frost when ready. For frosted ones, flash freeze them on a tray, then pack, but frosting might get a bit softer.
Q6: What’s your favorite heart cupcake decoration?
A: I love red and white sugar pearls for that classic Valentine’s touch, but sprinkles or edible glitter really make these romantic cupcakes pop. Honestly, the kids love adding their own creative twists too!
Q7: Any tips for preventing cakes from falling apart?
A: Don’t overmix your batter! This is a common misstep. Also, handle cupcakes gently when removing from pans and cutting shapes.
If you want a thorough dive into heart cupcake decoration, this How to decorate red velvet cupcakes? and the Heart Shaped Valentine’s Day Cupcakes – Mom Loves Baking post are fantastic resources to peek at. They really complement the baking tips I share and show how to bring these beautiful treats to life.
My Final Thoughts on This Heart-Shaped Cupcakes
I have to say, these Heart-Shaped Cupcakes hold such a special place in my heart. They’re more than just a sweet treat—they’re a celebration of little moments filled with love, whether it’s a shared afternoon with my kids or a cozy Valentine’s Day at home.
- Always sift your dry ingredients for the fluffiest cupcakes.
- Don’t rush cooling before frosting—that patience pays off beautifully.
- Use fresh cream cheese and good vanilla extract; those little details shine.
I’ve tried several variations with my family over the years, from classic red velvet cupcakes to playful chocolate hearts or even vanilla with strawberry frosting layered in heart shapes. My youngest is all about the red velvet, while my husband loves the vanilla strawberry twist. These recipes have become our festive staples, and I encourage you to make this Heart-Shaped Cupcakes your own by experimenting with flavors and decorations.
If you’re feeling inspired, you might also enjoy checking out my heartwarming and family-loved egg hashbrown casserole, a perfect savory balance after indulging in these sweet treats.
I truly hope this recipe brings you as much joy and cozy family memories as it has offered mine. Remember, baking is all about sharing love and joy—with a sprinkle of fun and a dollop of patience. So roll up your sleeves, grab your mixing bowl, and create some magic with these Heart-Shaped Cupcakes!
Happy baking, friend!
Heart-Shaped Cupcakes
Delight in these charming heart-shaped cupcakes, perfect for special occasions or a romantic treat. Soft, moist, and topped with creamy frosting, they combine classic cupcake flavors with a festive shape.
- Prep Time: 15 minutes
- Cook Time: 20 minutes
- Total Time: 35 minutes
- Yield: 12 servings
- Category: Dessert
- Method: Baked
- Cuisine: American
Ingredients
- 1 1/2 cups all-purpose flour
- 1 cup granulated sugar
- 1/2 cup unsalted butter, softened
- 2 large eggs
- 1/2 cup whole milk
- 1 1/2 teaspoons baking powder
- 1/4 teaspoon salt
- 1 teaspoon vanilla extract
- 1/2 cup unsweetened cocoa powder (optional for chocolate version)
- 1 cup buttercream frosting
- Red food coloring (optional)
- Heart-shaped cupcake liners or heart cupcake pan
Instructions
- Preheat your oven to 350°F (175°C) and prepare your heart-shaped cupcake pan by greasing it or lining with heart-shaped cupcake liners.
- In a medium bowl, whisk together flour, baking powder, salt, and cocoa powder (if using).
- In a large bowl, beat the softened butter and sugar until light and fluffy.
- Add eggs one at a time, beating well after each addition, then mix in vanilla extract.
- Alternately add the dry ingredients and milk to the butter mixture, beginning and ending with dry ingredients. Mix until just combined.
- Divide the batter evenly into the prepared heart-shaped pan or liners, filling each about 2/3 full.
- Bake for 18-22 minutes, or until a toothpick inserted into the center comes out clean.
- Allow cupcakes to cool in the pan for 5 minutes, then transfer to a wire rack to cool completely.
- If desired, tint buttercream frosting with red food coloring and frost cooled cupcakes.
- Serve and enjoy your romantic heart-shaped cupcakes!
Notes
For an extra touch, sprinkle with edible glitter or top with fresh berries for added color and flavor.