
Okay, friend, pull up a chair and let’s talk about something seriously fun and delicious: Halloween Oreo Dirt Cake. It’s one of those recipes that’s not only a blast to make, especially with the kids, but it’s also a total crowd-pleaser. I remember the first time I made it, it was for my son Leo’s fifth birthday, which is just a few weeks before Halloween. He was obsessed with spooky season, and I wanted to make him something extra special. I stumbled upon the idea of an Oreo graveyard cake and thought, “That’s it!” But being me, I had to put my own spin on it.
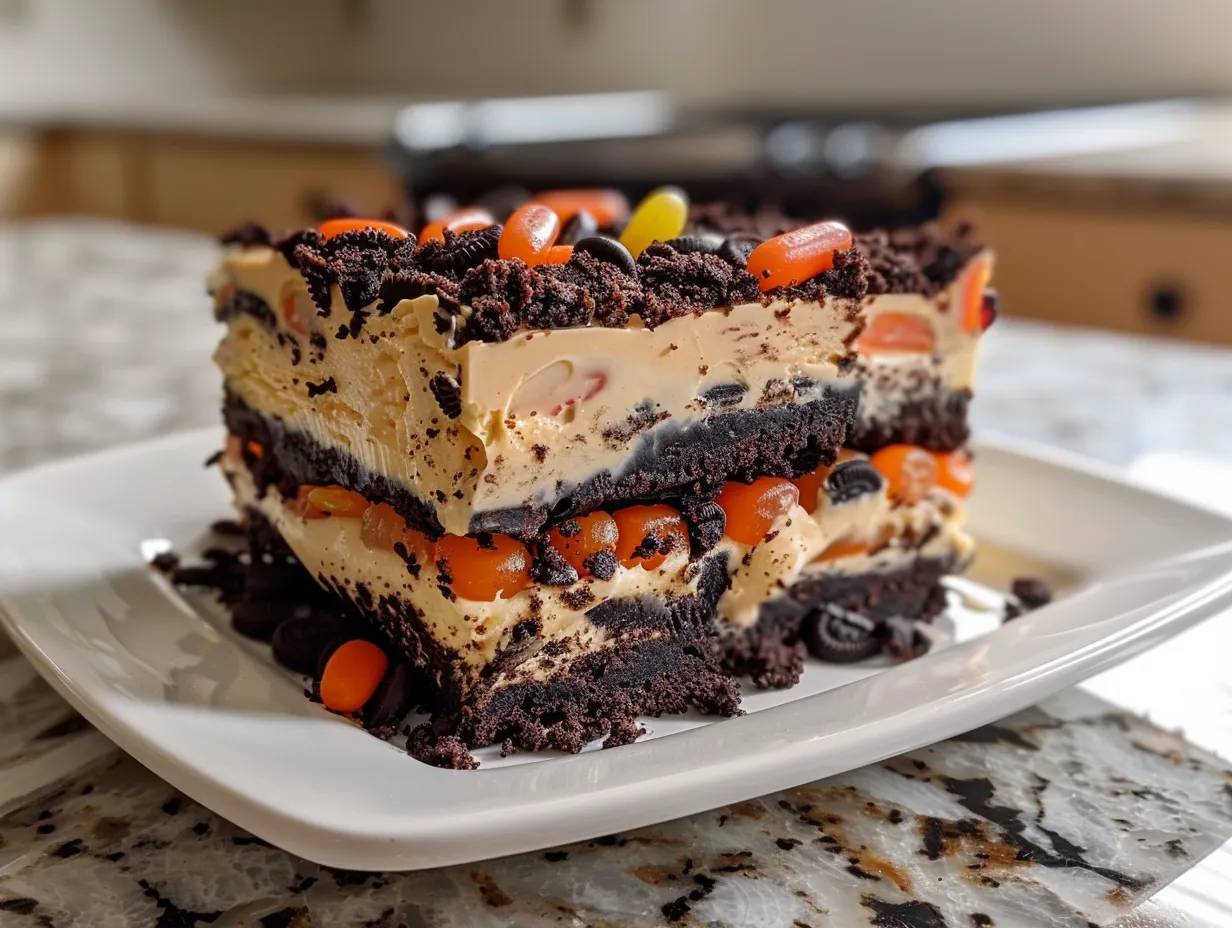
The sensory explosion when you bite into this Halloween Oreo Dirt Cake is just incredible. You get that creamy, cool pudding, the rich, chocolatey Oreos (duh!), and the whimsical decorations that just scream Halloween. I’ll never forget Leo’s face when he saw it – pure joy!
Of course, the first time I tried making it, I completely underestimated how much crushing Oreos the kids would “help” with (read: eat!). We ended up having to open another package halfway through! Ah, the joys of cooking with kids. That’s when I realized that easy Halloween desserts need to be truly easy, and this recipe totally fits the bill. It’s become a yearly tradition, and honestly, it wouldn’t be Halloween in our house without it. It’s perfect because you can prepare most of it ahead of time, which is a lifesaver when you’re juggling school, activities, and, well, life!
This Halloween Oreo Dirt Cake recipe is a perfect fit for my blog because it’s just what I love: simple, delicious, and perfect for sharing with loved ones. My cooking philosophy has always been about creating food that brings people together, and this dessert definitely does that. I hope you’ll give it a try and create your own spooky memories with this Halloween Oreo Dirt Cake! Let’s get baking!
What You’ll Need for This Halloween Oreo Dirt Cake
Okay, let’s gather our ingredients! Here’s what you’ll need to make this Halloween Oreo Dirt Cake magic happen. Don’t worry, it’s mostly stuff you probably already have in your pantry.
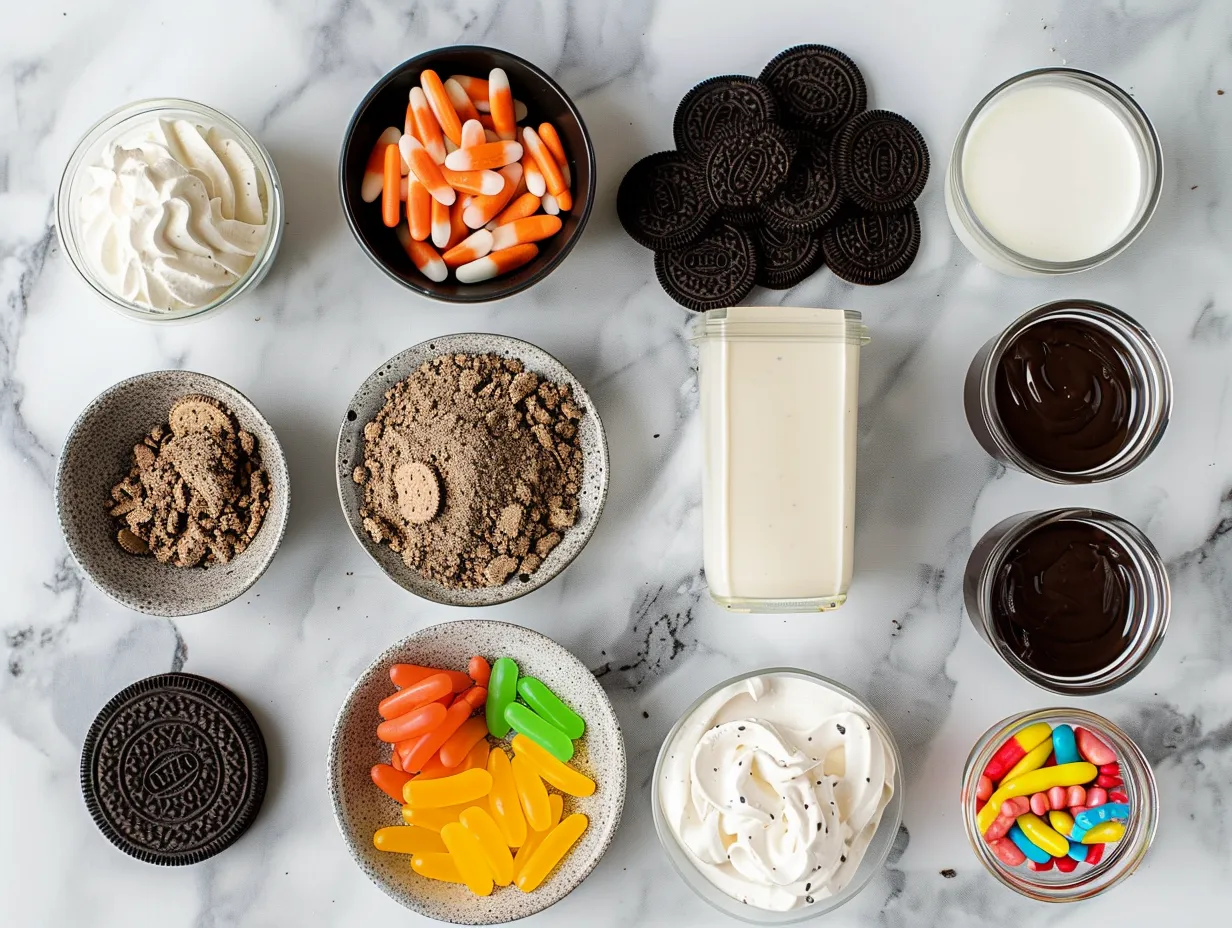
- 1 (16-ounce) package Oreo cookies: You’ll want the regular kind for that classic dirt texture. I always use the double-stuffed Oreos for my Halloween Oreo Dirt Cake because, well, more cream is always better, right? But honestly, any kind will work.
- 1 (8-ounce) package cream cheese, softened: Make sure it’s softened, or you’ll end up with lumpy pudding. Nobody wants that!
- ½ cup (1 stick) unsalted butter, softened: Same deal as the cream cheese – softened is key.
- 3 ½ cups powdered sugar: This is what gives the pudding its sweetness and structure.
- 1 (3.4-ounce) package instant vanilla pudding mix: I prefer vanilla, but you could totally use chocolate or even white chocolate for a fun twist!
- 3 cups milk: Whole milk will give you the richest, creamiest pudding, but you can use 2% or even almond milk if you prefer.
- 1 (12-ounce) container frozen whipped topping, thawed: Cool Whip is my go-to because it’s easy, but you can definitely make your own if you’re feeling ambitious.
- Gummy worms, candy pumpkins, and other Halloween candies: For decorating! Get creative and have fun with it.
- Optional: Chocolate sandwich cookies, Milano cookies, Pepperidge farm cookies, and white chocolate melts for tombstones.
Tips and Tricks
When making Halloween Oreo Dirt Cake, you can usually find the Oreo cookies on sale around Halloween, so keep an eye out for deals! I usually stock up so I can make a few batches. I learned a Halloween Oreo Dirt Cake trick from my grandma: she always adds a pinch of salt to the Oreo crumbs to balance the sweetness. It really does make a difference!
As far as shortcuts go, you can definitely buy pre-crushed Oreos to save some time, but honestly, crushing them is half the fun (especially if you have little helpers). For cost-saving, buying store-brand ingredients is a way to save when making Halloween Oreo Dirt Cake, the difference is negligible. Leftover cream cheese and butter can be stored in the fridge for about a week, or you can freeze them for longer storage. Now, let’s head on to the directions on how to use all the ingredients to make an Oreo dirt pudding!
Let’s Make This Halloween Oreo Dirt Cake Together
Alright, friend, let’s get our hands dirty (pun intended!) and make this Halloween Oreo Dirt Cake together. Don’t worry if you’re not a pro baker; this recipe is super forgiving.
Instructions
- Crush the Oreos: In a food processor or a large zip-top bag, crush the Oreo cookies into fine crumbs. Set aside about ½ cup of the crumbs for topping. If you’re using a zip-top bag, just seal it up and bash away with a rolling pin or a heavy pot. It’s a great way to relieve some stress!
- Make the cream cheese mixture: In a large bowl, beat the softened cream cheese and butter together with an electric mixer until smooth and creamy. Gradually add the powdered sugar, beating until well combined. Don’t worry if your Halloween Oreo Dirt Cake cream cheese mixture looks a little lumpy at first; just keep beating it, and it will smooth out. I learned the hard way with Halloween Oreo Dirt Cake that cold cream cheese and butter leads to lumps.
- Prepare the pudding: In a separate bowl, whisk together the instant vanilla pudding mix and milk until smooth. Let it stand for about 5 minutes to thicken. I usually use this time to clean up my workspace a bit, so it’s not so chaotic when I have to work.
- Combine the mixtures: Gently fold the pudding into the cream cheese mixture until well combined. Then, fold in the thawed whipped topping. Be gentle so you don’t deflate the whipped topping. The mixture should be light and airy. This is the base of our Halloween Oreo Dirt Cake.
- Assemble the dirt cake: In a large bowl or trifle dish, layer the Oreo crumbs and pudding mixture, starting with a layer of Oreo crumbs on the bottom. Repeat the layers until all the ingredients are used, ending with a layer of Oreo crumbs on top. For individual servings of Oreo dirt pudding, you can put the layers into individual cups.
- Decorate: Now comes the fun part! Arrange gummy worms, candy pumpkins, and other Halloween candies on top of the dirt cake to create a spooky scene. Get creative! You can even add some edible dirt or chocolate shavings for extra flair. I like to add Milano cookies as tombstones to make an Oreo graveyard cake. You can write words on them with melted white chocolate.
- Chill: Cover the dirt cake and refrigerate for at least 2 hours before serving. This allows the flavors to meld together, and the pudding to set up properly. In my kitchen, Halloween Oreo Dirt Cake usually takes about 2 hours to chill, but if you can wait longer, even better!
- Serve and Enjoy: Before serving, add a final dusting of Oreo crumbs, if desired. Dig in and enjoy your delicious Halloween Oreo Dirt Cake!
While the Halloween Oreo Dirt Cake is chilling, I usually start making dinner. Gotta keep those kiddos fed! Your Halloween Oreo Dirt Cake should smell like sweet cream and chocolate-y goodness. If you want to explore more Halloween dessert recipes, consider my no-bake pumpkin cheesecake balls.
How I Love to Serve This Halloween Oreo Dirt Cake
My family loves this Halloween Oreo Dirt Cake when I serve it chilled, right out of the fridge. It’s the perfect cool and creamy treat after a long day of school and Halloween activities. I love to serve it with a big glass of milk or a scoop of vanilla ice cream for an extra-indulgent dessert.
This Halloween Oreo Dirt Cake is perfect for Halloween parties, potlucks, or even just a fun family night in. I’ve also made it for school events and bake sales, and it’s always a hit. For presentation, I like to use a clear trifle dish so you can see all the beautiful layers. You can also serve it in individual clear cups for a more elegant presentation. If you have extra Halloween Oreo Dirt Cake, it’s great to store the leftovers in the fridge.
I’ve tried a few seasonal Halloween Oreo Dirt Cake variations. One year, I added a layer of pumpkin puree to the pudding mixture for a fall-flavored twist. It was delicious! I’ve also added crushed peanut butter cups for a chocolate-peanut butter version. Friends always ask for this Halloween Oreo Dirt Cake recipe whenever I bring it to a party. It’s that good! And, I get it, because this recipe is similar to this Halloween Dirt Cake.
Your Halloween Oreo Dirt Cake Questions Answered
Okay, let’s tackle some of the most common questions I get about making Halloween Oreo Dirt Cake. I’ve definitely made my fair share of mistakes along the way, so I’m happy to share my hard-earned wisdom.
- Can I make this Halloween Oreo Dirt Cake ahead of time? Absolutely! In fact, I recommend it. The longer it chills, the better the flavors meld together. You can easily make it a day or two in advance.
- Can I use a different kind of pudding? Of course! Vanilla is my go-to, but chocolate, white chocolate, or even butterscotch pudding would be delicious. Get creative and experiment!
- My pudding is lumpy. What did I do wrong? This usually happens when the cream cheese and butter are not softened enough. Make sure they are at room temperature before you start beating them together. You can also try adding a tablespoon or two of milk to help smooth it out.
- Can I make this Halloween Oreo Dirt Cake dairy-free? Yes, you can! Use dairy-free cream cheese, butter, milk, whipped topping, and pudding mix. There are plenty of great dairy-free alternatives available these days.
- How do I store leftover Halloween Oreo Dirt Cake? Store it in an airtight container in the refrigerator for up to 3 days.
- My Oreo crumbs are too dry. How do I fix it? Mix in a tablespoon or two of melted butter or a splash of milk. This will help moisten them up and prevent them from being too crumbly.
- Can I freeze this Halloween Oreo Dirt Cake? I don’t recommend freezing it, as the texture of the pudding and whipped topping can change. It’s best to enjoy it fresh. But what you can do is create Oreo pudding cups and freeze those ahead of time for little individual Halloween treats.
You know what I do when my Halloween Oreo Dirt Cake is too sweet? I add a squeeze of lemon juice to balance out the sweetness. It’s a little trick I learned from my grandma. I also make sure that the Oreo cookies are not just regular, but double stuffed as a way to make my Oreo dirt pudding extra delicious. One thing that I have learned in the kitchen is to be patient when baking. I have found some great Spooky Graveyard Dirt Cups tips.
My Final Thoughts on This Halloween Oreo Dirt Cake
This Halloween Oreo Dirt Cake recipe holds a special place in my heart because it’s a reminder of all the fun memories I’ve made with my family in the kitchen. It’s a recipe that’s been passed down through generations, and I hope it will continue to be a tradition for your family as well.
My Halloween Oreo Dirt Cake Pro Tips:
- Don’t be afraid to get creative with the decorations. The more spooky and fun, the better!
- Use a variety of Halloween candies to add texture and flavor. Gummy worms, candy pumpkins, chocolate shavings, and even edible glitter can all add a special touch.
- Chill the dirt cake for at least 2 hours before serving. This will allow the flavors to meld together, and the pudding to set up properly.
I’ve tried a few Halloween Oreo Dirt Cake variations over the years. One year, I added a layer of peanut butter cups to the middle of the cake. It was a huge hit with my son, Leo, who is a peanut butter fanatic. My daughter, Mia, loves when I add a layer of crushed pretzels for a salty-sweet twist. And my husband, David, is a big fan of the pumpkin version I mentioned earlier. You can also create a unique Oreo graveyard cake by placing Milano cookies as tombstones around it. If you are looking for another way to spice up your cooking, check out my caramel apple cheesecake dip.
I encourage you to make this Halloween Oreo Dirt Cake your own. Don’t be afraid to experiment with different flavors and decorations. The most important thing is to have fun and create something that you and your family will love. My hope is that this recipe brings you as much joy as it has brought my family over the years. So, go ahead, grab your ingredients, put on some spooky music, and get ready to make some memories. I know you can do it! And, I am certain that you will enjoy your Halloween Oreo Dirt Cake!
Halloween Oreo Dirt Cake

This Halloween Oreo Dirt Cake is a fun and festive dessert that’s perfect for parties. Layers of crushed Oreos, creamy pudding, and gummy worms create a spooky and delicious treat everyone will love!
- Prep Time: 20 minutes
- Cook Time: 0 minutes
- Total Time: 20 minutes
- Yield: 12 servings
- Category: Dessert
- Method: No-Cook
- Cuisine: American
Ingredients
- 1 (15 ounce) package Oreo cookies, crushed
- 1 (8 ounce) package cream cheese, softened
- 1/2 cup butter, softened
- 3 1/2 cups powdered sugar
- 1 (16 ounce) container frozen whipped topping, thawed
- 2 (3.4 ounce) packages instant vanilla pudding mix
- 3 cups milk
- Gummy worms and Halloween sprinkles for decoration
Instructions
- Crush the Oreo cookies into fine crumbs. Reserve about 1/2 cup for topping.
- In a large bowl, beat together the cream cheese and butter until smooth and creamy.
- Gradually add the powdered sugar and beat until well combined.
- Fold in the thawed whipped topping.
- In a separate bowl, whisk together the vanilla pudding mix and milk until smooth. Let stand for 5 minutes to thicken slightly.
- Gently fold the pudding mixture into the cream cheese mixture.
- In a large glass bowl or trifle dish, layer half of the crushed Oreos, half of the pudding mixture, and then repeat the layers.
- Top with the reserved Oreo crumbs, gummy worms, and Halloween sprinkles.
- Refrigerate for at least 2 hours before serving to allow the flavors to meld.
Notes
For an extra spooky touch, add a layer of chocolate pudding in between the vanilla pudding layers. You can also use different types of Halloween candy for decoration.