
Okay, friend, come on in, grab a mug of tea, and let’s talk pie. Not just any pie, mind you, but a Burnt Honey Pie. This one holds a special place in my heart, not just because it’s absolutely divine, but because it represents a little victory in my kitchen – and we all know how those feel!
I remember the first time I attempted a Burnt Honey Pie. I was feeling ambitious, saw a beautiful picture online, and thought, “I can totally do that!” Famous last words, right? Well, the honey definitely burnt. Like, smoke-detector-screaming, windows-open burnt. The kids were coughing, my husband was fanning the air, and I was ready to throw the whole thing in the trash. But something told me to salvage it, to see if there was any flavor hiding beneath the char. And you know what? There was! That slightly bitter, deeply caramelized flavor was… incredible. It was the happy accident that led to this, my absolute favorite Burnt Honey Pie recipe.
Over the years, I’ve tweaked and perfected that initial disaster into a dessert that my family begs for. My youngest, Leo, calls it “magic pie,” and my husband claims it’s the best thing I make (don’t tell my lasagna!). What I love most about this Burnt Honey Pie is how it fits into our crazy, busy life. It’s elegant enough for a holiday gathering, but simple enough to whip up on a Sunday afternoon when we’re craving something sweet. It’s a testament to the fact that even kitchen mishaps can lead to something truly wonderful. You know, just like that time I tried to make Crispy Feta Chicken with Hot Honey Drizzle with way too much honey…
I hope you’ll give this recipe a try. It’s a little bit different, a little bit unexpected, and a whole lot delicious. Don’t be intimidated by the “burnt” part – it’s more about achieving a deep, rich caramelization that adds complexity to the honey flavor. Trust me, once you taste it, you’ll be hooked. I really got to learn the nuances of working with honey when I was playing around with recipes using hot honey like in this Hot Honey Infused Feta Chicken recipe. So, let’s get baking! I promise, you can do this.
What You’ll Need for This Burnt Honey Pie
Alright, let’s gather our ingredients. For this Burnt Honey Pie, quality is key, especially when it comes to the honey. Here’s what you’ll need:
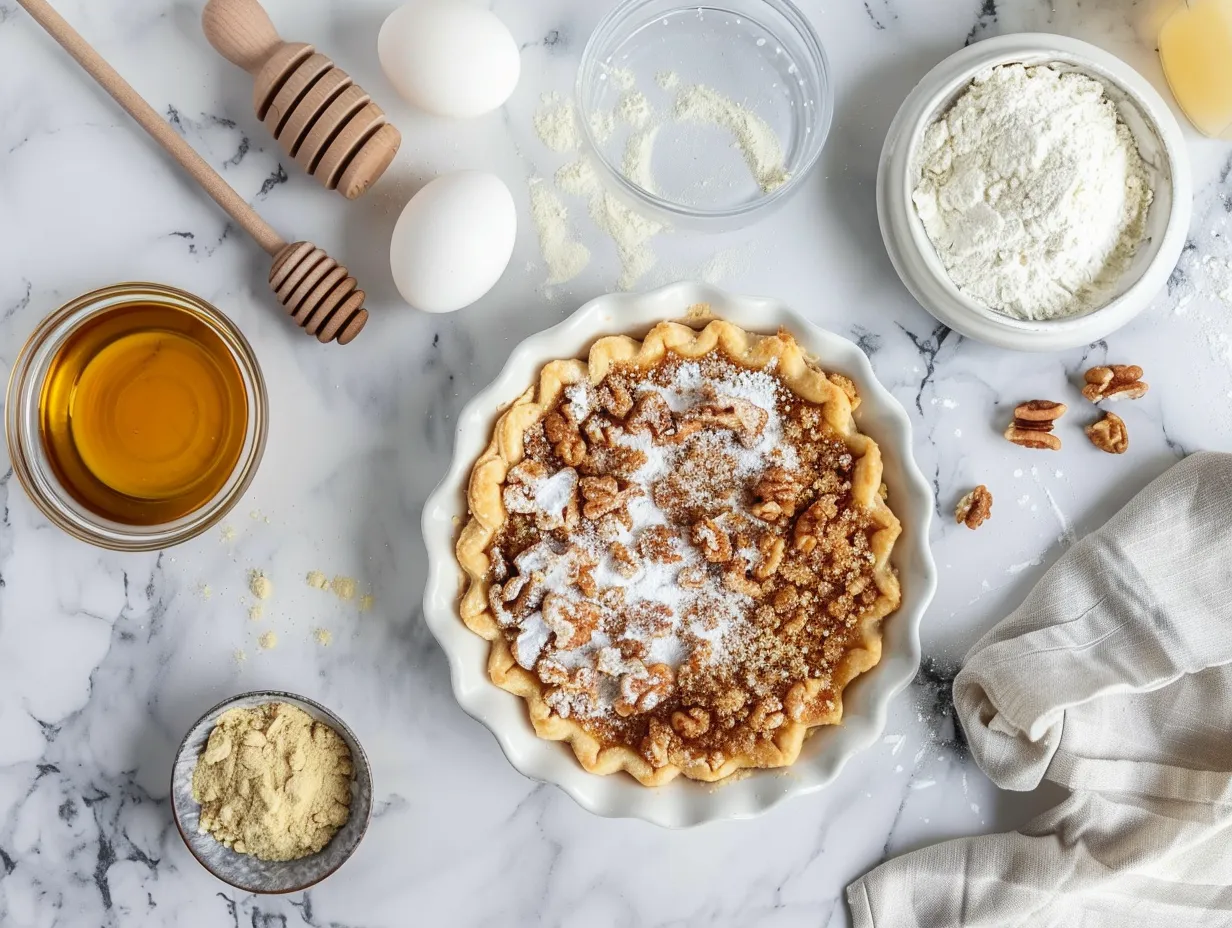
- All-Butter Pie Crust: 1 pre-made or homemade (I have a recipe I can share if you want!)
- Honey: 1 cup (I always use a local wildflower honey for my Burnt Honey Pie – it has the best flavor.)
- Heavy Cream: 1 cup
- Eggs: 3 large
- Egg Yolks: 2 large (This makes the Burnt Honey Pie extra rich!)
- Salt: 1/4 teaspoon
- Vanilla Extract: 1 teaspoon
- Unsalted Butter: 2 tablespoons, cold and cubed
When making Burnt Honey Pie, you can find really good quality honey at your local farmer’s market or even some specialty grocery stores. I’ve even seen some infused honeys that would make for delicious honey pie variations! The most important thing is to find a honey that you love the taste of, because its flavor will really shine through in the final pie.
Here’s a Burnt Honey Pie trick I learned from my grandmother: always chill your pie crust before filling it. This helps prevent it from shrinking while baking. Speaking of tips, my shortcut for busy weeknights is to use a pre-made crust, but I splurge on the good quality, all-butter kind. It’s worth it! To save a few bucks, I sometimes buy honey in bulk. Just make sure to store it properly in a cool, dark place. If your honey crystallizes, simply warm it gently in a saucepan or microwave until it becomes liquid again. And a little secret? If you want to add a little twist, a touch of bourbon can really work with the honey!
As for the leftover ingredients, heavy cream can be stored in the fridge for about a week, and extra eggs can be used for omelets or quiches. No waste in this kitchen!
Let’s Make This Burnt Honey Pie Together
Okay, let’s get down to business! Don’t worry, I’ll walk you through each step. Remember, even if things don’t go perfectly, it will still taste amazing. That’s the beauty of the Burnt Honey Pie! If you are looking for something savory, I recommend you try my hot honey recipe.
- Preheat and Prep: Preheat your oven to 350°F (175°C). Place your pie crust in a pie dish and crimp the edges. I learned the hard way with Burnt Honey Pie that a good crimp prevents spills! Dock the bottom of the crust with a fork to prevent it from puffing up.
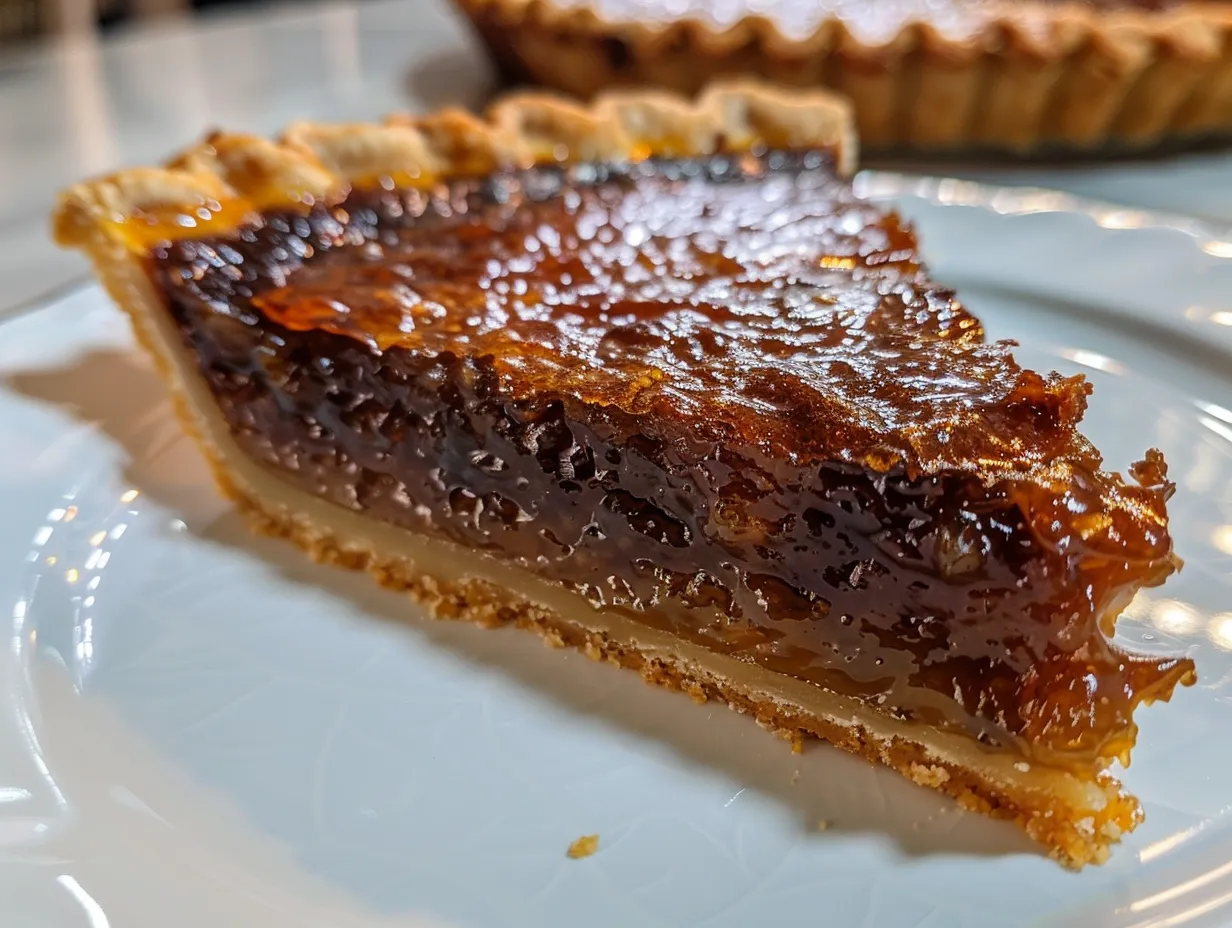
- Burn the Honey (Carefully!): In a medium saucepan, heat the honey over medium heat. This is the most important step! Cook, stirring constantly, until the honey darkens in color and begins to smoke slightly. It should smell deeply caramelized, almost like burnt sugar. Be careful not to actually burn it to a crisp – you want that intense caramel flavor, not bitter charcoal. For me, this Burnt Honey Pie caramelization process usually takes about 5-7 minutes, but it depends on your stove.
- Whisk the Custard: In a separate bowl, whisk together the heavy cream, eggs, egg yolks, salt, and vanilla extract. Make sure everything is well combined.
- Temper the Eggs: Slowly pour the hot honey into the egg mixture, whisking constantly to prevent the eggs from cooking. This is a crucial step! If you pour the hot honey in too quickly, you’ll end up with scrambled eggs, not a creamy custard. Don’t worry if your Burnt Honey Pie mixture looks a little lumpy at first – just keep whisking until it’s smooth.
- Add the Butter: Stir in the cold, cubed butter until it’s melted and the mixture is smooth and glossy.
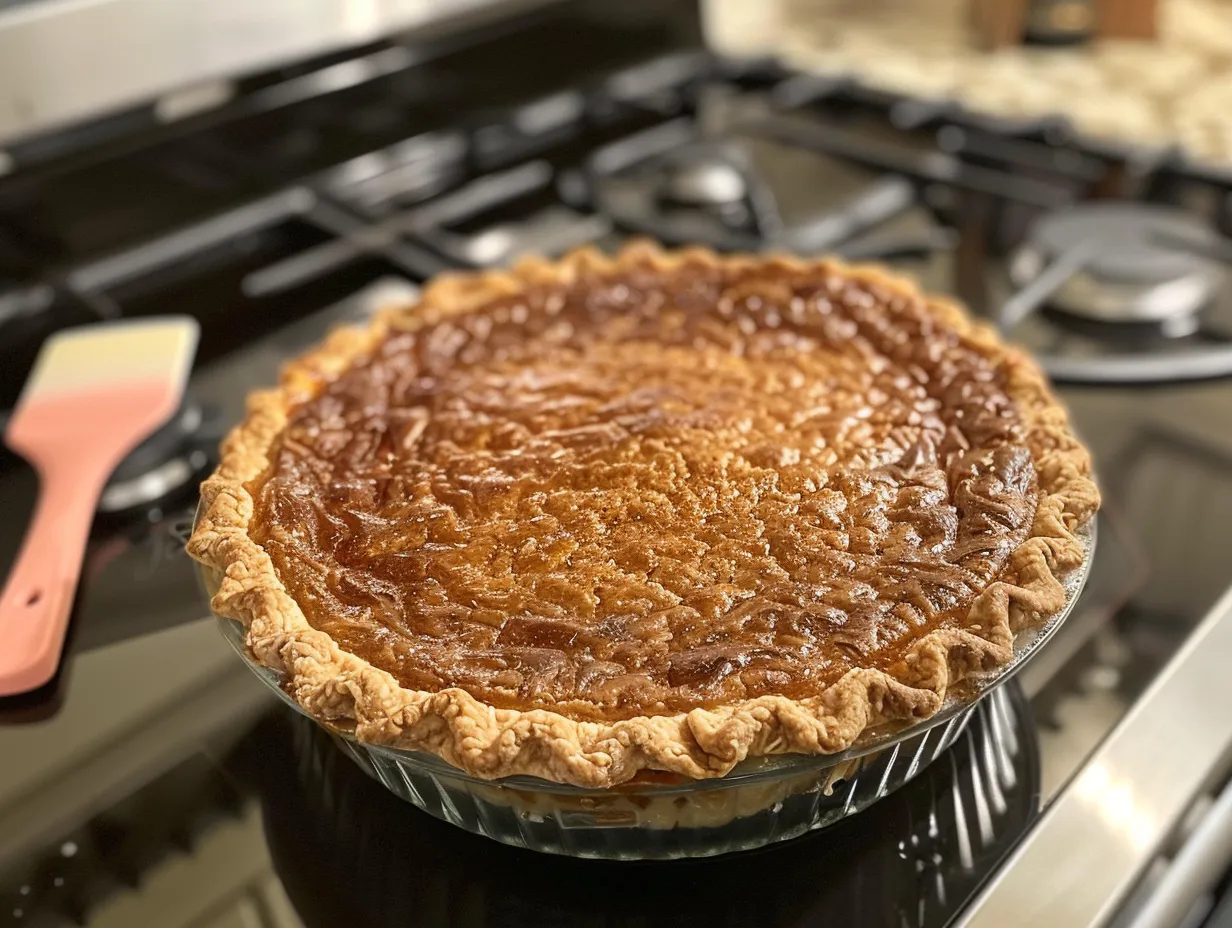
- Pour and Bake: Pour the burnt honey filling into the prepared pie crust. Bake for 45-55 minutes, or until the filling is set around the edges but still slightly jiggly in the center. While the Burnt Honey Pie is cooking, I usually tidy up the kitchen or start prepping dinner. Multitasking is my superpower!
- Cool and Chill: Let the pie cool completely on a wire rack before chilling it in the refrigerator for at least 2 hours. This allows the custard to set fully and the flavors to meld together.
- Serve and Enjoy: Slice and serve chilled. I like to add a dollop of whipped cream or a sprinkle of sea salt for extra pizzazz. Your Burnt Honey Pie should smell like a warm, sweet, caramelized dream.
Easy peasy, right? Okay, maybe not easy peasy, but definitely doable! With a little patience and a lot of love, you’ll have a Burnt Honey Pie that will impress everyone.
How I Love to Serve This Burnt Honey Pie
My family loves this Burnt Honey Pie when I serve it with a big dollop of homemade whipped cream and a sprinkle of flaky sea salt. The salt really cuts through the sweetness of the honey and enhances the caramel notes. It’s also amazing with a scoop of vanilla ice cream or even a drizzle of extra honey. I’ve even seen others serve up Caramelized Honey Pumpkin Pie!
This Burnt Honey Pie is perfect for any occasion. I’ve made it for Thanksgiving, Christmas, birthdays, and even just a random Tuesday night when we needed a little pick-me-up. It’s a crowd-pleaser every time. For presentation, I like to dust the top of the pie with powdered sugar or cocoa powder. You can also garnish it with fresh berries or a sprig of mint. Get creative!
If you have extra Burnt Honey Pie (which is rare in my house!), you can store it in the refrigerator for up to 3 days. I actually think it tastes even better the next day, after the flavors have had a chance to develop even more. Sometimes, I’ll crumble leftover Burnt Honey Pie over yogurt or granola for a decadent breakfast.
I’ve also experimented with a few seasonal honey pie variations. In the fall, I add a touch of pumpkin spice to the filling. In the summer, I use a honey that has hints of lavender and add a few fresh blueberries on top. The possibilities are endless!
Friends always ask for this Burnt Honey Pie recipe after they try it. It’s become my signature dessert. I even had one friend offer to pay me to make her one for her birthday! It’s just that good.
Your Burnt Honey Pie Questions Answered
Okay, let’s tackle some common questions about this Burnt Honey Pie. I’ve learned a lot through trial and error (and a few burnt batches!), so hopefully, my experience can help you avoid some of the pitfalls.
Q: My honey burned! What do I do?
A: We’ve all been there! If your honey is seriously burnt – like, black and acrid – you’ll need to start over. But if it’s just a little too dark, don’t panic. The caramelized flavor is what we’re going for, so a slightly darker color is okay. Just make sure it doesn’t taste bitter.
Q: My pie crust shrank while baking. How can I prevent this?
A: Shrinking pie crust is the bane of every baker’s existence! Make sure you chill your pie crust before filling it, and dock the bottom with a fork. You can also blind bake the crust for about 15 minutes before adding the filling.
Q: My custard is lumpy. What did I do wrong?
A: Lumpy custard usually means the eggs cooked too quickly. Make sure you temper the eggs slowly by whisking the hot honey into the egg mixture gradually. If you still end up with lumps, you can try straining the mixture through a fine-mesh sieve before pouring it into the pie crust. I had this problem when I was first starting out, and it taught me the importance of patience.
Q: Can I use a different type of honey?
A: Absolutely! I encourage you to experiment with different honeys to find your favorite flavor. I used to use local honey but recently I have found that you can make a very similar salted version in this Salted Honey Pie recipe Lavender honey, orange blossom honey, and buckwheat honey would all be delicious in this pie. Just keep in mind that the flavor of the honey will really shine through, so choose one that you love.
Q: Can I make this pie ahead of time?
A: Yes! In fact, I recommend it. The Burnt Honey Pie tastes even better after it’s been chilled for a few hours, as the flavors have had time to meld together. You can make it up to 2 days in advance and store it in the refrigerator.
Q: My pie is browning too quickly. What should I do?
A: If your pie is browning too quickly, you can tent it with foil. Just loosely cover the top of the pie with aluminum foil to protect it from the heat.
Q: Can I freeze this pie?
A: I haven’t tried freezing this particular pie, but I suspect it would be okay. Just make sure to wrap it tightly in plastic wrap and then in foil to prevent freezer burn. Thaw it in the refrigerator overnight before serving. I bet this pie will be just as good as salted honey pie recipe.
I once had a blog reader tell me that she added a pinch of cayenne pepper to her Burnt Honey Pie, and it was amazing! My husband, on the other hand, prefers a simple, classic version. That’s what’s so great about this recipe – you can customize it to your own taste.
My Final Thoughts on This Burnt Honey Pie
This Burnt Honey Pie recipe isn’t just a dessert; it’s a memory, a comfort, and a reminder that even mistakes can lead to something beautiful. It holds a special place in my heart because it represents a little bit of magic in my kitchen. It started with my love for those Russian honey cakes Russian honey cakes!
My Burnt Honey Pie Pro Tips:
- Don’t skip the chilling time! It’s crucial for the custard to set properly.
- Use a high-quality honey. It makes all the difference in the flavor.
- Don’t be afraid to experiment! Try adding different spices, extracts, or toppings to create your own unique version.
As for honey pie variations, I’ve tried adding a splash of bourbon, a pinch of cinnamon, and even a swirl of Nutella to the filling. My youngest, Leo, loves the Nutella version, while my husband prefers the classic.
I hope you’ll try this recipe and make it your own. Don’t be afraid to get creative and have fun with it. And remember, even if your honey burns a little, it’s okay! That’s part of the charm.
I hope this Burnt Honey Pie brings you as much joy as it brings my family. Happy baking! And don’t forget to share your creations with me – I can’t wait to see what you come up with!
Burnt Honey Pie
This Burnt Honey Pie features a deep, caramelized honey flavor in a silky smooth custard filling. The subtle smokiness of the burnt honey pairs perfectly with a flaky, buttery crust, making it an unforgettable dessert.
- Prep Time: 30 minutes
- Cook Time: 50 minutes
- Total Time: 1 hour 20 minutes
- Yield: 8 servings
- Category: Dessert
- Method: Baked
- Cuisine: American
Ingredients
- 1 1/4 cups all-purpose flour
- 1/2 teaspoon salt
- 1/2 cup (1 stick) cold unsalted butter, cut into cubes
- 1/4 cup cold vegetable shortening, cut into cubes
- 5-7 tablespoons ice water
- 1 cup heavy cream
- 1/2 cup whole milk
- 4 large egg yolks
- 1/2 cup granulated sugar
- 1/4 teaspoon salt
- 1/2 cup burnt honey (see instructions for making burnt honey)
- Pinch of flaky sea salt, for garnish
Instructions
- Make the Pie Crust: In a large bowl, whisk together flour and salt. Cut in butter and shortening using a pastry blender or your fingers until the mixture resembles coarse crumbs.
- Gradually add ice water, 1 tablespoon at a time, mixing until the dough just comes together. Form the dough into a disk, wrap in plastic wrap, and chill for at least 30 minutes.
- On a lightly floured surface, roll out the dough to a 12-inch circle. Transfer to a 9-inch pie plate, crimp the edges, and chill for another 30 minutes.
- Make the Burnt Honey: In a medium saucepan, heat honey over medium heat. Cook, swirling occasionally, until it darkens to a deep amber color and starts to smell smoky and slightly bitter, about 5-7 minutes. Immediately remove from heat and let cool slightly. Be careful not to burn the honey completely, as it will become too bitter.
- Make the Custard: Preheat oven to 350°F (175°C). In a saucepan, combine heavy cream and milk. Heat until just simmering. Remove from heat.
- In a separate bowl, whisk together egg yolks, sugar, and salt. Slowly drizzle the hot cream mixture into the egg yolk mixture, whisking constantly to temper the eggs.
- Stir in the burnt honey until well combined.
- Pour the custard into the chilled pie crust.
- Bake for 45-55 minutes, or until the filling is set around the edges but still slightly wobbly in the center.
- Let cool completely on a wire rack before serving.
- Garnish with a pinch of flaky sea salt before serving.
Notes
Serve chilled or at room temperature. A dollop of whipped cream or a scoop of vanilla ice cream would complement the burnt honey flavor beautifully.