
Okay, here we go! Let’s talk about my absolute favorite cheesecake – the one that’s delightfully imperfect and surprisingly easy: the Burnt Basque Cheesecake.
You know, there are some desserts that just scream “special occasion,” but this one? This one’s special because it’s perfect for any occasion. I remember the first time I made a Burnt Basque Cheesecake. It was for my daughter Sofia’s impromptu birthday get-together. I had been so busy with work, I almost forgot! I needed something quick, easy, and impressive. I stumbled upon a Basque cheesecake recipe online, intrigued by the “burnt” part.
Honestly, I was a little skeptical. Burnt? On purpose? But the pictures looked incredible. I followed the easy cheesecake recipe, crossed my fingers, and hoped for the best.
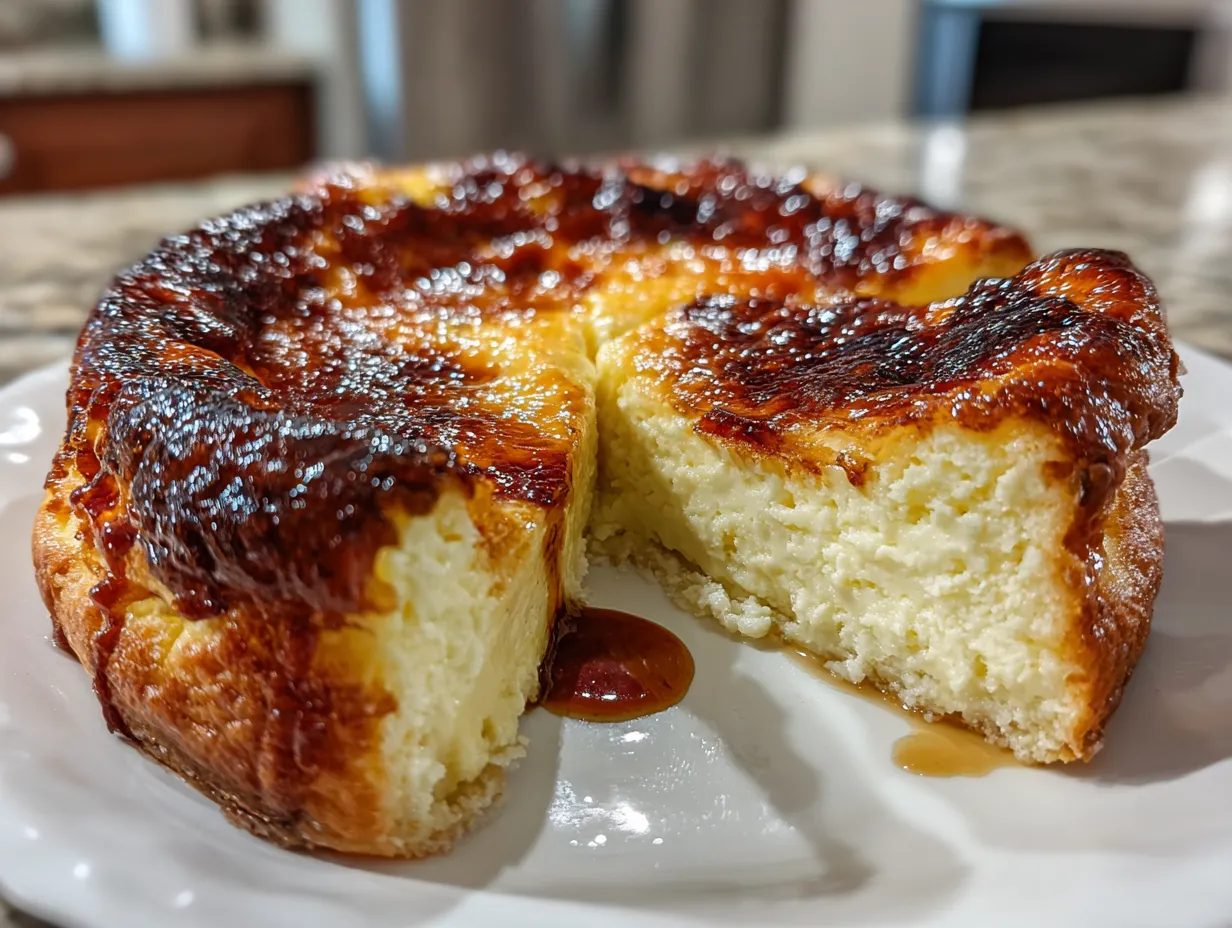
The aroma that filled my kitchen as it baked was divine – a rich, caramelized scent that promised something extraordinary. When I pulled it out of the oven, it looked… well, it looked burnt! But beneath that dark exterior was the most luscious, creamy interior I had ever tasted. Sofia and her friends devoured it! That day, Burnt Basque Cheesecake became a family favorite.
The beauty of this dessert lies in its simplicity. No fancy crust, no water bath, no intricate decorations. Just a handful of ingredients and a hot oven. Trust me, if I can make this work amidst the chaos of homework, soccer practice, and my crazy blog schedule, you can too! It’s the perfect crustless cheesecake for a busy weeknight or a potluck.
The imperfections are what make it beautiful, and the taste? Oh, the taste! It’s a rich, creamy, slightly tangy experience that will have everyone begging for more.
I first perfected my Burnt Basque Cheesecake recipe after countless trials and errors. I even made a mistake once where I left it in the oven for too long and it was totally burnt. We all have those cooking mishaps, right? But the key is to learn from them! What I’ve learned is that a dark top is what you need.
My cooking philosophy is all about creating delicious, comforting food that brings people together. I don’t believe in complicated recipes or fussy techniques. Food should be joyful, nourishing, and, most importantly, shareable. And this Burnt Basque Cheesecake embodies all of that.
So, grab your springform pan, and let’s get baking! I promise, this is one Tarta de queso you’ll be making again and again. Are you ready to get started on this San Sebastian cheesecake?
What You’ll Need for This Burnt Basque Cheesecake
Alright, let’s gather our ingredients. The best part about this Burnt Basque Cheesecake is that you probably already have most of these things in your fridge. It’s seriously so simple.
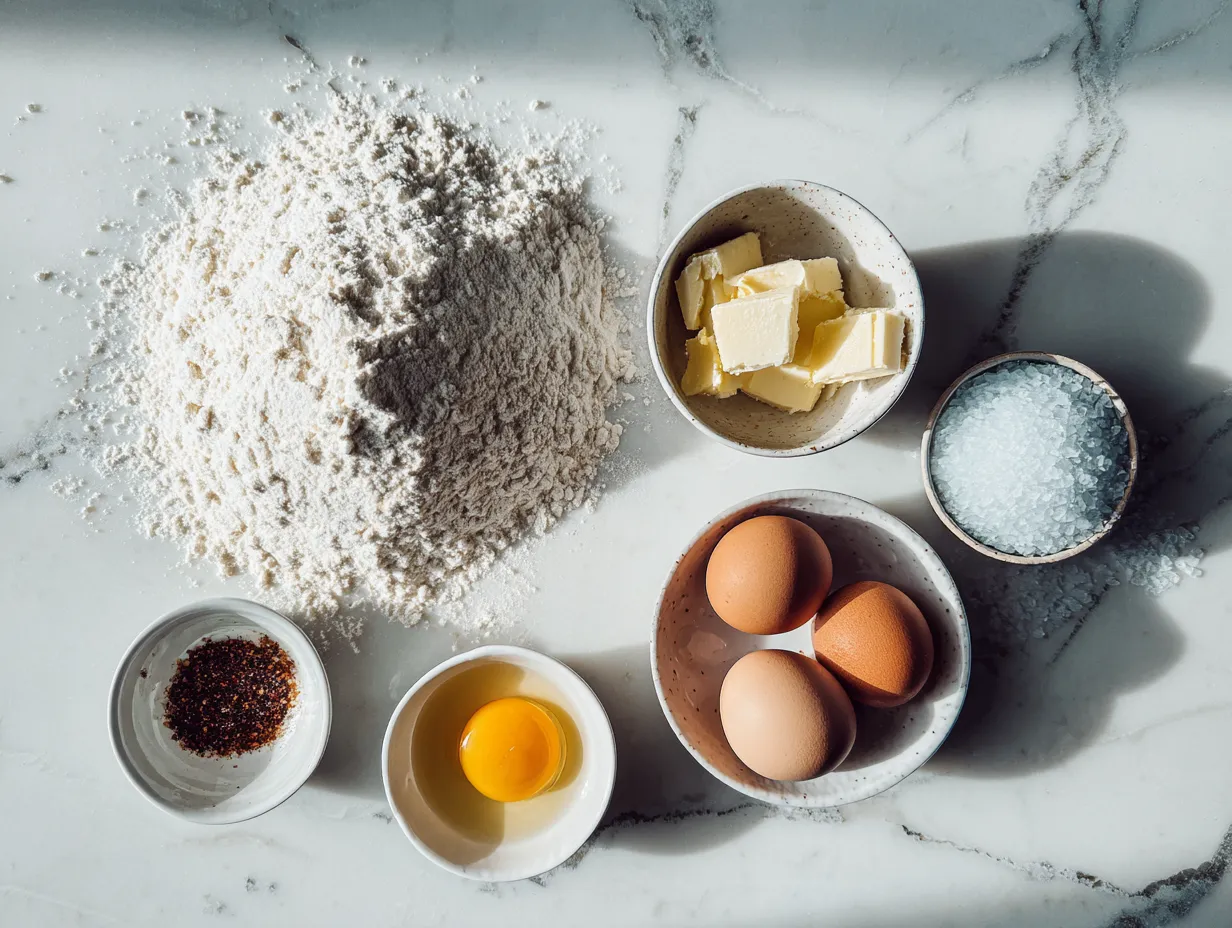
- 32 ounces (4 cups) Cream Cheese: I always use full-fat cream cheese for my Burnt Basque Cheesecake. It gives it that super creamy texture that we all love. Trust me, it’s worth it!
- 1 ½ cups Granulated Sugar: Just regular white sugar is perfect.
- 6 Large Eggs: Make sure they’re at room temperature for easier mixing.
- 2 cups Heavy Cream: Again, full-fat is the way to go. Don’t skimp on the cream!
- 1 teaspoon Vanilla Extract: Pure vanilla extract is best, but imitation works in a pinch.
- Pinch of Salt: Just a little bit to balance the sweetness.
- Parchment Paper: This is essential for lining your springform pan.
Now, a little kitchen wisdom for you: when making Burnt Basque Cheesecake, I learned that the quality of your ingredients really matters. Especially the cream cheese! Cheap cream cheese can sometimes be a little grainy, and you definitely don’t want that in your cheesecake. I found this article about where to find Basque cheesecake in Jacksonville, I’ve found that specialty stores often carry high-quality cream cheese.
Here’s a Burnt Basque Cheesecake trick I learned from my grandma: if you forgot to take your eggs out of the fridge ahead of time, just pop them in a bowl of warm water for about 10 minutes. It’ll bring them up to room temperature in no time!
For busy families, here’s a great shortcut: you can use pre-cut parchment paper rounds for your springform pan. It saves you the hassle of cutting and shaping the paper yourself. Plus, I always check for sales on cream cheese. Sometimes you can find it at a great price, and I stock up!
As for storage, if you have any leftover Burnt Basque Cheesecake (which is rare in my house!), just cover it tightly with plastic wrap and keep it in the fridge. It’ll stay good for about 3-4 days. And honestly, I think it tastes even better the next day!
And if you’re in the mood for another no-bake cheesecake recipe, check out my no-bake pumpkin cheesecake balls! They’re the perfect sweet treat.
Let’s Make This Burnt Basque Cheesecake Together
Okay, let’s get to the fun part! I promise, this Burnt Basque Cheesecake is so easy, even the most beginner baker can pull it off. I’ll walk you through it step-by-step.
- Preheat your oven to 400°F (200°C). This high heat is what gives the cheesecake its signature “burnt” top. Don’t be scared!
- Line a 9-inch springform pan with parchment paper. This is super important! The parchment paper should be crumpled and pressed into the pan, overhanging the edges. Don’t worry about making it perfect; the wrinkles add to the rustic look.
- In a large bowl, beat the cream cheese and sugar together until smooth and creamy. I use a stand mixer for this, but a hand mixer works just as well. Just make sure there are no lumps! We want a super creamy base for our Burnt Basque Cheesecake.
- Add the eggs one at a time, mixing well after each addition. Don’t overmix! Overmixing can incorporate too much air and cause the cheesecake to crack.
- Pour in the heavy cream and vanilla extract, and mix until just combined. Again, be gentle!
- Add a pinch of salt and give it one final mix.
- Pour the batter into the prepared springform pan.
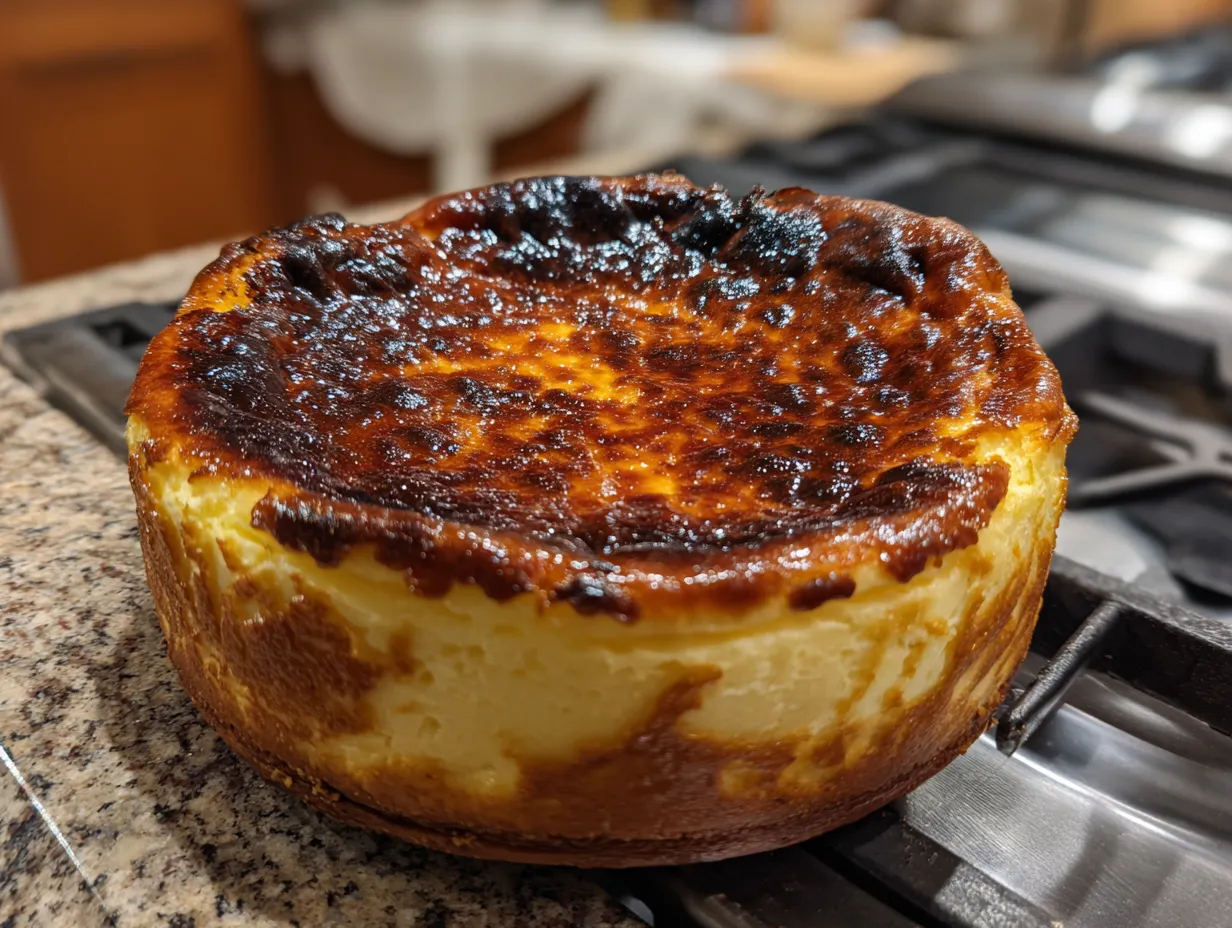
- Bake for 50-60 minutes, or until the top is deeply browned and the center is still slightly jiggly. This is the trickiest part. In my kitchen, Burnt Basque Cheesecake usually takes about 55 minutes. But oven temperatures vary, so keep an eye on it. The top should be a dark, almost burnt-looking brown. It’s important to get a dark color to ensure the Tarta de queso has that signature taste!
- Let the cheesecake cool completely in the pan. This is crucial! Don’t even think about cutting into it while it’s still warm. It needs time to set up and firm up.
- Once cooled, remove the cheesecake from the pan and carefully peel away the parchment paper. I like to chill mine in the fridge for at least 2 hours before serving.
Here are some personal Burnt Basque Cheesecake cooking tips: I learned the hard way with Burnt Basque Cheesecake that a slightly wobbly center is a good thing. It means the cheesecake is perfectly creamy and not overbaked. If it’s completely firm in the oven, it’ll be dry.
While the Burnt Basque Cheesecake is cooking, I usually clean up the kitchen or start prepping dinner. It’s a great way to multitask! And your Burnt Basque Cheesecake should smell like caramelized sugar and rich cream. It’s heavenly!
Don’t worry if your Burnt Basque Cheesecake cracks on top. It’s perfectly normal and adds to the rustic charm. Remember, imperfections are what make this cheesecake so special!
And if you want to try another delicious cheesecake recipe, check out my caramel apple cheesecake dip! Your kids will surely enjoy that one.
How I Love to Serve This Burnt Basque Cheesecake
Okay, so you’ve baked your Burnt Basque Cheesecake, it’s cooled, and you’re ready to serve it. Now what? Well, let me tell you how my family loves to enjoy this decadent dessert.
My family loves this Burnt Basque Cheesecake when I serve it with fresh berries. The tartness of the berries cuts through the richness of the cheesecake perfectly. I usually go for raspberries, blueberries, or strawberries, depending on what’s in season. A dusting of powdered sugar adds a nice touch, too.
As for side dishes, honestly, this Burnt Basque Cheesecake is rich enough to stand on its own. But if you want to get fancy, a scoop of vanilla ice cream or a dollop of whipped cream is always a welcome addition. A cup of coffee or tea is the perfect accompaniment as well.
This Burnt Basque Cheesecake is perfect for any occasion, really. From casual weeknight dinners to special celebrations like birthdays and holidays. It’s always a crowd-pleaser! I also like to bring it to potlucks because it’s so easy to transport and everyone always raves about it.
When it comes to presentation, I like to keep it simple. I usually just place the Burnt Basque Cheesecake on a pretty serving platter and let its rustic beauty shine. I might add a few sprigs of mint or some fresh flowers for a pop of color.
If you have extra Burnt Basque Cheesecake (which, again, is rare), you can crumble it over ice cream or yogurt. Or you can even use it to make a Burnt Basque Cheesecake milkshake! Just blend it with some milk and ice cream for a super indulgent treat.
As for seasonal variations, I’ve tried adding different flavorings to the batter. In the fall, I like to add a pinch of cinnamon and nutmeg. In the summer, I might add some lemon zest or a splash of limoncello. The possibilities are endless! I needed a Basque burnt cheesecake recipe and I played around with it a little bit.
Friends always ask for this Burnt Basque Cheesecake recipe whenever I make it. They’re always amazed at how easy it is to make something that tastes so decadent and impressive. Sometimes when I’m at home, I see posts on Facebook groups about people needing it, like this one: Basque burnt cheesecake recipe needed!
Your Burnt Basque Cheesecake Questions Answered
Okay, let’s tackle some of the most common questions I get about my Burnt Basque Cheesecake. I’ve made this so many times, I feel like I could answer them in my sleep!
Q: My Burnt Basque Cheesecake cracked on top. What did I do wrong?
A: Don’t worry! Cracking is perfectly normal and doesn’t affect the taste. It’s usually caused by a rapid change in temperature. You know what I do when my Burnt Basque Cheesecake cracks? I just dust it with powdered sugar! It covers up the cracks and adds a touch of sweetness.
Q: My Burnt Basque Cheesecake is too jiggly in the center. Is it underbaked?
A: A little jiggle is good! It means the center is nice and creamy. If it’s really jiggly, you can bake it for another 5-10 minutes. But err on the side of caution, as overbaking will result in a dry cheesecake.
Q: Can I use low-fat cream cheese for this Burnt Basque Cheesecake?
A: I wouldn’t recommend it. Low-fat cream cheese doesn’t have the same richness and texture as full-fat, and your Burnt Basque Cheesecake might not turn out as creamy.
Q: Can I make this Burnt Basque Cheesecake ahead of time?
A: Absolutely! In fact, I think it tastes even better the next day. Just cover it tightly and store it in the fridge.
Q: My Burnt Basque Cheesecake is too brown on top. Did I burn it?
A: The top is supposed to be deeply browned, almost burnt-looking. But if it’s black and smells burnt, then yes, you might have overbaked it. Next time, try reducing the oven temperature by 25 degrees.
Q: Can I add flavorings to this Burnt Basque Cheesecake?
A: Of course! Get creative! I’ve added lemon zest, cinnamon, nutmeg, and even a splash of liquor. Just don’t add too much liquid, as it can affect the texture. My family loves the lemon zest version!
Q: My parchment paper stuck to the Burnt Basque Cheesecake. How can I prevent that?
A: Make sure you grease the parchment paper with butter or cooking spray before pressing it into the pan. This will help it release more easily. And don’t be afraid to use a generous amount of parchment paper, so it overhangs the edges of the pan. This makes it easier to lift the cheesecake out.
I hope these answered your questions! Don’t be afraid to experiment and have fun with this crustless cheesecake. It’s a very forgiving recipe!
My Final Thoughts on This Burnt Basque Cheesecake
This Burnt Basque Cheesecake recipe holds a special place in my heart because it’s a reminder that perfection isn’t always necessary. Sometimes, the most delicious things in life are the ones that are a little bit messy and imperfect.
This recipe is not only an easy cheesecake recipe, but it is also my go-to when I want something simple but satisfying.
Here are my Burnt Basque Cheesecake Pro Tips:
- Don’t be afraid of the “burnt” top! That’s where all the flavor is.
- Use high-quality cream cheese for the best texture.
- Let the cheesecake cool completely before serving. It makes a big difference!
As for variations, I’ve tried adding chocolate chips, chopped nuts, and even a swirl of caramel to my Burnt Basque Cheesecake. My daughter Sofia loves the chocolate chip version, while my husband prefers the one with caramel.
And speaking of variations, this San Sebastian cheesecake is another name for Burnt Basque Cheesecake, so don’t be confused if you see it called that!
I encourage you to make this Burnt Basque Cheesecake your own. Don’t be afraid to experiment with different flavors and toppings. Have fun with it!
I hope you enjoy making this Burnt Basque Cheesecake as much as I do. It’s a simple, delicious, and crowd-pleasing dessert that’s perfect for any occasion. And remember, don’t stress about making it perfect. The imperfections are what make it special! Gimme Some Oven also did a great article on the “Burnt” Basque Cheesecake (Tarta de Queso) “Burnt” Basque ….
Happy baking, my friends! And if you’re still craving cheesecake, don’t forget to try my pumpkin cheesecake truffles! Let me know how your Burnt Basque Cheesecake turns out! I can’t wait to hear about your baking adventures!
Burnt Basque Cheesecake
This Burnt Basque Cheesecake is a crustless wonder with a deeply caramelized exterior and a creamy, custardy interior. It’s incredibly easy to make and delivers a sophisticated dessert with minimal effort.
- Prep Time: 15 minutes
- Cook Time: 60 minutes
- Total Time: 75 minutes
- Yield: 8 servings
- Category: Dessert
- Method: Baked
- Cuisine: Spanish
Ingredients
- 24 ounces (680g) cream cheese, softened
- 1 ½ cups (300g) granulated sugar
- 5 large eggs
- 1 cup (240ml) heavy cream
- 1 teaspoon vanilla extract
- ¼ teaspoon salt
- 2 tablespoons (15g) all-purpose flour
Instructions
- Preheat oven to 400°F (200°C). Line a 9-inch springform pan with two layers of parchment paper, allowing the paper to extend several inches above the rim.
- In a large bowl, beat the softened cream cheese and sugar together until smooth and creamy.
- Add the eggs one at a time, beating well after each addition.
- Stir in the heavy cream, vanilla extract, and salt until well combined.
- Sift in the flour and mix until just combined. Do not overmix.
- Pour the batter into the prepared springform pan.
- Bake for 50-60 minutes, or until the top is deeply browned and the center is slightly jiggly. The cheesecake will continue to set as it cools.
- Let the cheesecake cool completely in the pan at room temperature, then refrigerate for at least 4 hours before serving.
- Carefully remove the cheesecake from the pan, peel away the parchment paper, and serve.
Notes
Serve the cheesecake chilled or at room temperature. A dusting of powdered sugar is optional, but not necessary. Enjoy!