
Okay, friend, gather ’round the kitchen counter! Today, we’re diving headfirst into comfort food territory with a recipe that’s been a total game-changer in my house: the Grilled Cheese Burrito. Just saying it makes my mouth water! I remember the first time I made it – it was a total “wing it” kind of night. My kids were begging for grilled cheese, my husband wanted a burrito, and I was staring into the fridge thinking, “There HAS to be a way to make everyone happy!” That’s when the Grilled Cheese Burrito was born!
The smell…oh, the smell! That golden, buttery, slightly charred aroma mingling with the warm, cheesy filling…it’s pure magic. It fills the kitchen with a cozy vibe that instantly makes everyone feel at home. Honestly, this Grilled Cheese Burrito has saved me on so many hectic weeknights. There was that one time when I completely forgot to plan dinner, and this recipe swooped in like a superhero. It’s quick, easy, and uses ingredients we almost always have on hand. Plus, the best part? It’s completely customizable! You can throw in whatever leftover veggies, beans, or cooked meats you have lurking in the fridge. It’s the ultimate clean-out-the-fridge kind of meal!
I’ve had my fair share of cooking fails, believe me! I once tried to get too fancy with the cheese in my Grilled Cheese Burrito, and it ended up oozing out everywhere and sticking to the pan. What a mess! But that’s how you learn, right? I realized that simple is often best, and a good, melty cheddar is always a winner.
This whole cooking thing for me is all about making delicious food that brings people together. I don’t believe in complicated recipes with fancy ingredients. I’m all about simple, wholesome, and real food that anyone can make. And this Grilled Cheese Burrito recipe embodies that perfectly. It’s a warm hug on a plate – or rather, in a tortilla!
So, are you ready to join me? Grab your apron, and let’s make some Grilled Cheese Burritos together! I promise, it’ll become a family favorite in no time. Before we get started, if you are looking for a great appetizer to get the meal started, you might want to try these No Bake Pumpkin Cheesecake Balls – they are always a huge hit!
What You’ll Need for This Grilled Cheese Burrito
Alright, let’s gather our troops! Here’s what you’ll need to create this cheesy masterpiece. Don’t worry, the ingredient list is short and sweet – just the way we like it.
- 4 large flour tortillas (I always use the burrito size; they hold more fillings!)
- 2 cups shredded cheddar cheese (I always use sharp cheddar for my Grilled Cheese Burrito; it gives it a nice kick!)
- 2 tablespoons butter, divided (or olive oil, if you prefer)
- Optional fillings: cooked ground beef, shredded chicken, black beans, rice, salsa, sour cream, guacamole (get creative!)

Now, here’s a little kitchen wisdom I’ve picked up over the years making a Grilled Cheese Burrito. When you’re buying your tortillas, check the expiration date! Nobody wants a stale burrito. And if you’re feeling fancy, you can even warm the tortillas slightly before adding the filling – this makes them more pliable and less likely to tear. A quesadilla burrito can be just as good with the right ingredients and preparation. Thinking about dinner tonight? Grab this cheesy burrito.
For the cheese, pre-shredded cheese is a lifesaver on busy weeknights. But if you have the time, grating your own cheese is always the best way to go. Freshly grated cheese melts more evenly and has a better flavor. Trust me, it makes a difference in your Grilled Cheese Burrito! When making a cheesy burrito, I prefer to shred my own cheddar cheese.
And speaking of cheese, don’t be afraid to experiment! Monterey Jack, Pepper Jack, or even a blend of cheeses would be delicious in this Grilled Cheese Burrito. As for the fillings, the sky’s the limit! I often raid the fridge for leftovers to add to mine. It’s a great way to use up those odds and ends and create a new and exciting meal. You can find tortillas at almost any grocery store but if you want authentic tortillas try a local Mexican grocery store when making a Grilled Cheese Burrito.
To save on ingredients you can use store brand cheddar cheese when making a Grilled Cheese Burrito. Any leftover filling can be stored in the fridge in an airtight container. Shredded cheese can be stored in the freezer for later use when making this easy burrito recipe.
Let’s Make This Grilled Cheese Burrito Together
Okay, friend, let’s get cooking! Here’s how to turn those simple ingredients into a delicious Grilled Cheese Burrito. Don’t worry if you’re not a pro; I’ll walk you through it step-by-step.
Instructions
- Prepare your fillings: If you’re using any optional fillings like cooked ground beef, shredded chicken, black beans, or rice, have them ready to go. Warm them up if necessary.
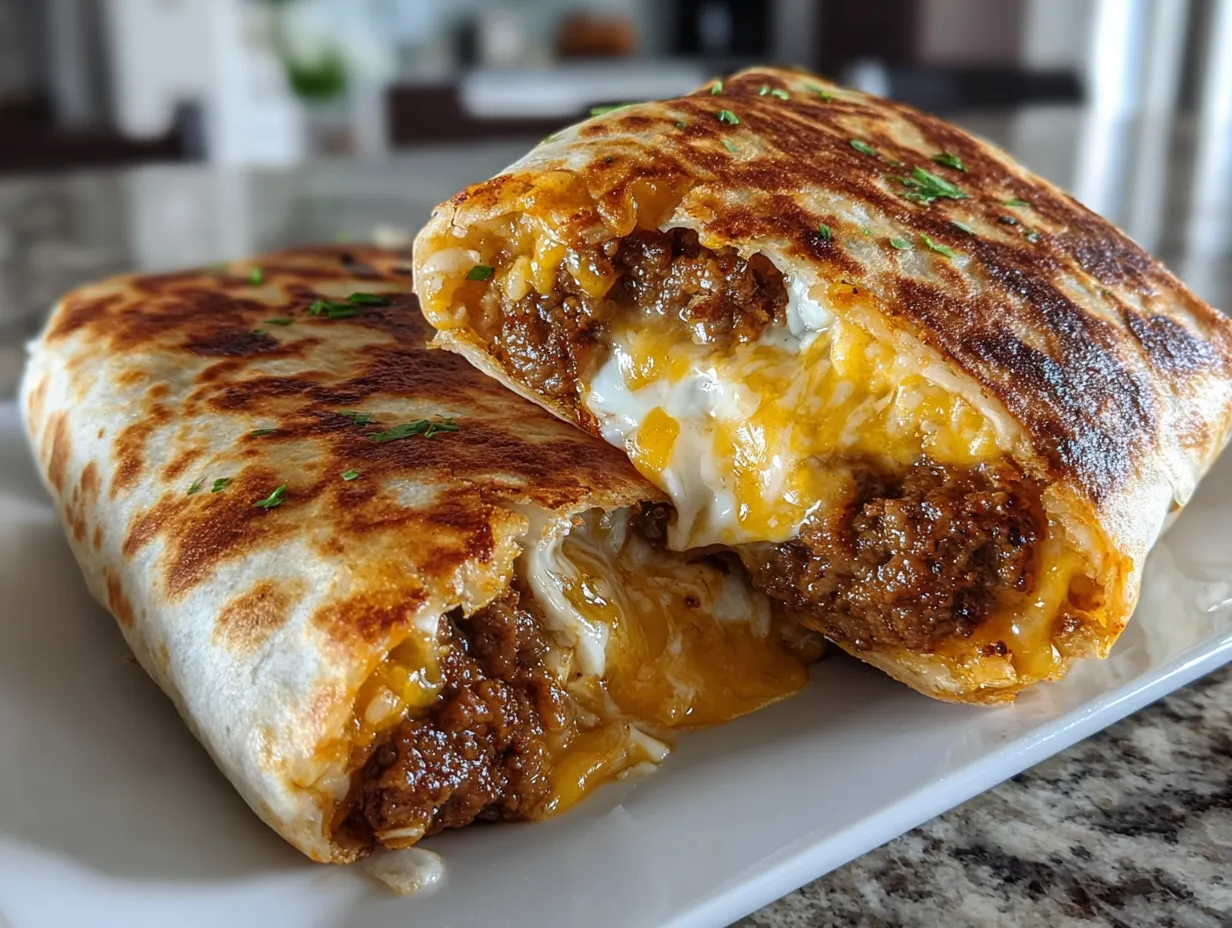
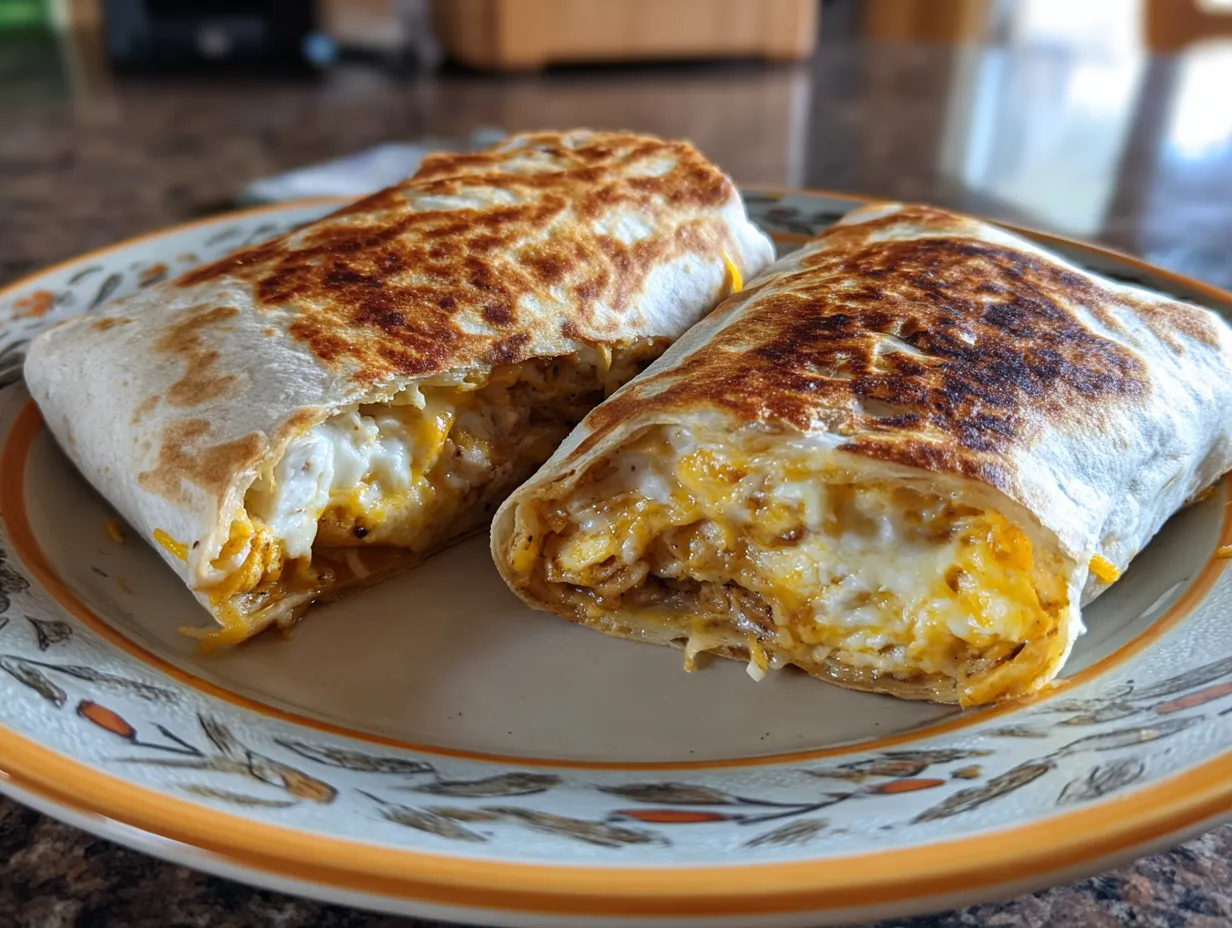
- Assemble the Grilled Cheese Burrito: Lay one tortilla flat on a clean surface. Sprinkle about ½ cup of shredded cheddar cheese evenly over the tortilla, leaving about an inch of space around the edges. If you’re using any fillings, add them on top of the cheese. Top with another ½ cup of shredded cheddar cheese.
- Fold the Grilled Cheese Burrito: Fold in the sides of the tortilla, then fold up the bottom and roll it tightly to form a burrito.
- Grill the Grilled Cheese Burrito: Melt ½ tablespoon of butter in a large skillet or griddle over medium heat. Place the burrito in the skillet, seam-side down. Cook for 3-4 minutes per side, or until the tortilla is golden brown and crispy, and the cheese is melted and gooey. I learned the hard way with Grilled Cheese Burrito that if you over fill it, it can be hard to keep the burrito together!
- Repeat with the remaining tortillas and fillings.
- Serve immediately and enjoy your delicious Grilled Cheese Burrito.
Now, a few tips from my kitchen to yours. Don’t worry if your Grilled Cheese Burrito isn’t perfectly shaped. As long as it tastes good, that’s all that matters! And if the cheese starts to ooze out a little, don’t panic. It just means it’s extra cheesy! While the Grilled Cheese Burrito – House of Yumm is cooking, I like to prep any sides we’re having. A simple salad or some tortilla chips and salsa are always a hit.
In my kitchen, the Grilled Cheese Burrito usually takes about 15-20 minutes from start to finish. It’s a quick and easy meal that’s perfect for busy weeknights.
Your Grilled Cheese Burrito should smell like warm, melted cheese and slightly toasted tortilla. It’s an irresistible aroma that will have everyone running to the kitchen. I’ve discovered that you can also make this Grilled Cheese Burrito in an air fryer for a super crispy tortilla! Check out Copycat Taco Bell Grilled Cheese Burrito (Cheesy & Crispy!) for another take on the recipe.
A family-tested Grilled Cheese Burrito shortcut I use is to assemble the burritos ahead of time and store them in the fridge until I’m ready to cook them. This saves a lot of time on busy nights.
How I Love to Serve This Grilled Cheese Burrito
Okay, so you’ve got your Grilled Cheese Burrito all warm and melty…now what? Well, let me tell you how my family loves to devour these things! My family loves this Grilled Cheese Burrito when I serve it with a dollop of sour cream and a side of fresh salsa. The cool sour cream and spicy salsa balance out the richness of the cheese perfectly.
Go-to side dishes are Mexican rice and refried beans. They’re classic pairings that never disappoint. And if I’m feeling extra fancy, I’ll whip up a batch of guacamole. This Grilled Cheese Burrito is perfect for a quick weeknight dinner, a casual weekend lunch, or even a fun party snack. It’s so versatile!
When I make this Grilled Cheese Burrito, I like to cut it in half on the diagonal and arrange it on a plate with a side of sour cream and salsa. It looks so inviting, and it’s easy to eat. If you have extra Grilled Cheese Burrito, you can store it in the fridge for up to 2 days. Just reheat it in the microwave or in a skillet until warmed through.
I’ve tried a few seasonal variations over the years. In the fall, I like to add some roasted butternut squash and a sprinkle of cinnamon to the filling. It’s a surprisingly delicious combination! In the summer, I add some grilled corn and black beans for a fresh and flavorful twist. Friends always ask for this Grilled Cheese Burrito recipe when I make it for parties. It’s always a crowd-pleaser! Here’s an easy tip if you are entertaining – place the burritos on a baking sheet and keep them warm in a 200 degree oven until you are ready to serve them.
Here’s a serving tip that will elevate your Grilled Cheese Burrito: try serving it with a side of spicy buffalo chicken mac and cheese! It will take your comfort food game to the next level! Here’s a great recipe for Spicy Buffalo Chicken Mac and Cheese if you want to try it.
Your Grilled Cheese Burrito Questions Answered
Alright, let’s tackle some of those burning questions you might have about making the perfect Grilled Cheese Burrito. I’ve been there, made the mistakes, and learned from them, so I’m here to share my wisdom with you!
- Can I use different types of cheese? Absolutely! You can use any cheese that melts well, such as Monterey Jack, Pepper Jack, mozzarella, or even a blend of cheeses. My family loves it when I use a combination of cheddar and Monterey Jack.
- Can I add vegetables to my Grilled Cheese Burrito? Of course! Grilled onions and peppers, sautéed mushrooms, or even some chopped tomatoes would be delicious. You know what I do when my Grilled Cheese Burrito needs a little extra something? I add some caramelized onions! They add a touch of sweetness and depth of flavor that takes it to the next level.
- What if my tortilla tears when I’m folding it? Don’t worry, it happens! Just try to patch it up as best you can. The cheese will help to hold it together. Next time, try warming the tortilla slightly before folding it to make it more pliable.
- Can I make these ahead of time? Yes, you can assemble the burritos ahead of time and store them in the fridge until you’re ready to cook them. Just be sure to wrap them tightly in plastic wrap to prevent them from drying out. You can also find more suggestions on the Homemade taco bell grilled cheese burrito recipe.
- What’s the best way to reheat a Grilled Cheese Burrito? The best way is to reheat it in a skillet over medium heat. Just cook it for a few minutes per side, until it’s warmed through and the cheese is melted. You can also reheat it in the microwave, but the tortilla might get a little soggy.
- Can I freeze these Grilled Cheese Burritos? I haven’t tried freezing them myself, but I imagine they would freeze okay. Just be sure to wrap them tightly in plastic wrap and then in a freezer bag. When you’re ready to eat them, thaw them overnight in the fridge and then reheat them in a skillet or in the microwave. This easy burrito recipe can be adapted to your own needs.
- My cheese isn’t melting all the way. What am I doing wrong? Make sure you’re using a cheese that melts well. Also, make sure your skillet is hot enough. If the skillet isn’t hot enough, the tortilla will brown before the cheese has a chance to melt. If this happens, you can try covering the skillet with a lid to help trap the heat and melt the cheese. The amount of melted cheese in burrito will depend on the type of cheese you use.
My Final Thoughts on This Grilled Cheese Burrito
So there you have it, my friend! My go-to Grilled Cheese Burrito recipe that’s been a lifesaver on countless busy weeknights. It’s more than just a recipe; it’s a symbol of happy family dinners, quick and easy solutions, and the joy of creating something delicious with simple ingredients. This melted cheese burrito will become a family favorite in no time.
This Grilled Cheese Burrito recipe holds a special place in my heart because it’s a reminder that you don’t need fancy ingredients or complicated techniques to create a meal that everyone will love. It’s about taking something simple and turning it into something extraordinary.
My Grilled Cheese Burrito Pro Tips:
- Don’t Overfill: It’s tempting to stuff your burrito with all sorts of goodies, but trust me, less is more! Overfilling will make it difficult to fold and cook evenly.
- Use a Non-Stick Skillet: This will prevent the tortilla from sticking and burning.
- Don’t Be Afraid to Experiment: Try different cheeses, fillings, and toppings to create your own signature Grilled Cheese Burrito.
As for variations, we’ve tried a few over the years. My son loves it with BBQ chicken, while my daughter prefers it with black beans and corn. My husband is a purist and sticks to the classic cheese and beef combo. I personally love a Grilled Cheese Burrito with sauteed mushrooms and onions. No matter how you make it, I hope you enjoy it as much as we do!
I hope you’ll give this Grilled Cheese Burrito recipe a try and make it your own. Experiment with different fillings, cheeses, and toppings until you find the perfect combination that your family loves. Remember, cooking is all about having fun and creating memories in the kitchen. Happy cooking, friend!
Grilled Cheese Burrito

This Grilled Cheese Burrito combines the comforting flavors of a grilled cheese sandwich with the satisfying wrap of a burrito. A cheesy, melty delight perfect for a quick and easy meal.
- Prep Time: 2 minutes
- Cook Time: 5 minutes
- Total Time: 7 minutes
- Yield: 1 serving
- Category: Lunch
- Method: Skillet
- Cuisine: American
Ingredients
- 2 large flour tortillas
- 2 slices cheddar cheese
- 2 slices Monterey Jack cheese
- 2 tablespoons butter, divided
Instructions
- Melt 1 tablespoon of butter in a skillet over medium heat.
- Place one tortilla in the skillet.
- Top with cheddar cheese and Monterey Jack cheese.
- Place the second tortilla on top of the cheese.
- Cook for 2-3 minutes per side, or until the cheese is melted and the tortillas are golden brown.
- Remove from skillet and cut in half. Serve immediately.
Notes
Serve with your favorite salsa or a side of tomato soup for dipping.